While holding it bottom side up, place the firing-pin safety spring end first into its appropriate channel. Then, orient and place the extractor in its appropriate recess above the ejection port. Depressing the firing-pin safety with a punch or Glock Tool will create the necessary clearance to slide the ejector into place. Releasing the firing-pin safety will hold the extractor in place.
Now, place your slide on the workbench again and install the extractor depressor plunger assembly so that the metal end contacts the extractor and the spring-loaded bearing faces rearward. (Note: if you are working on an OEM slide, the only thing left to do is reinstall the striker assembly, cover plate and sights. If, however, this is a new/custom build a channel liner must be installed before the striker assembly, cover plate and sights can be added.)
Channel Liner Installation
OEM Glocks contain a cylindrically-shaped, polymer tube located inside the slide’s striker channel, which encompasses the striker.
However, building a Glock from scratch or having an OEM pistol Cerakoted, requires a channel liner be installed. (Note: When properly installed, they are friction fit and therefore unlikely to inadvertently become dislodged or fall out. Given such tight tolerances, they mangle easily (during installation/removal) and it is recommended that you keep a few spares handy.
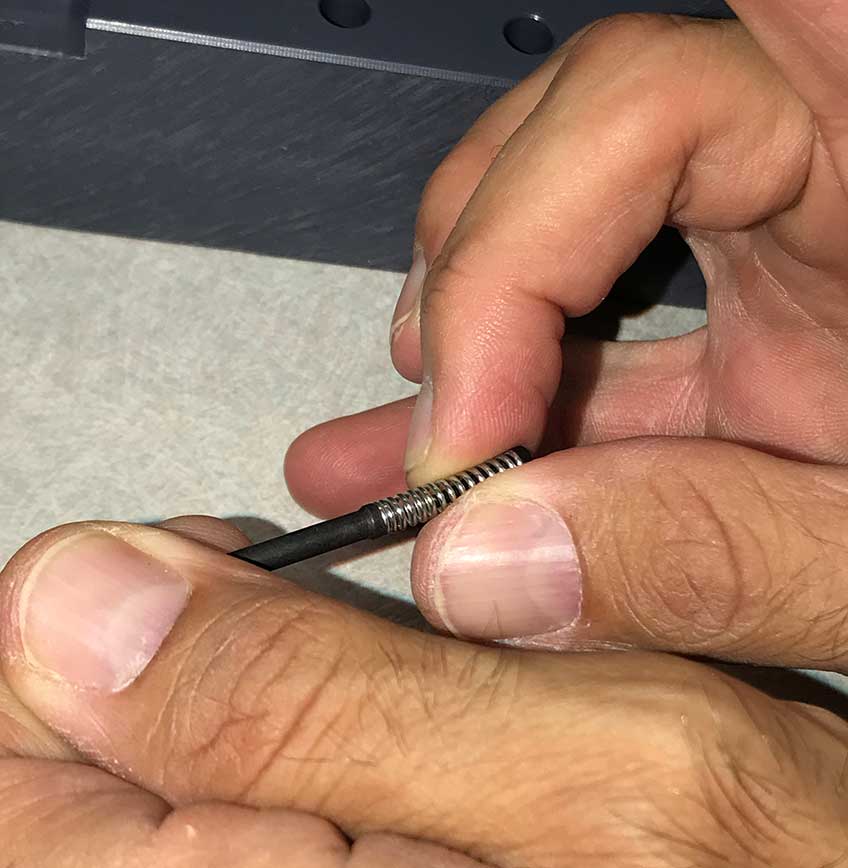
To install a new channel liner, be sure insert it into the slider with the beveled end facing down. A tight fit will prevent it from going in easily. Companies such as The Glock Store, Lone Wolf Distributors and Rimfire Gunworks make tools specifically designed for working with channel liners, but in a pinch you can use a punch similar in size to the liner’s inner diameter. A slight rocking motion may prevent binding as you lower the channel into place. If needed a non-marring mallet can be used to gently tap it into place, but keep in mind the liner is made of thin polymer that will bell, rip and/or tear quite easily. So, keep your temptations for using silver-backed gorilla strength in check. (Don’t ask me how I know this.)
Striker-Assembly Installation
To install the striker assembly, place it in the back of the slide, orient it so the lug can access the correspond groove in the slide.
Next, start the slide-cover place into place while depressing the end of the striker-spacer sleeve with a punch or Glock Tool until upward thumb pressure allows the plate to glide over it.
Finally, repeat the process, this time depressing the spring-loaded bearing until the cover plate snaps into place and is fully seated.
To test the placement of the striker, use a flat-head screwdriver or punch to slide the striker back and forth in the slide. It should rebound easily under tension. If not, repeat the process.
Sight Installation
No matter what type of part you need for your Glock myriad aftermarket options abound and sights are no exception. Though primarily separated into adjustable and fixed variants, numerous design configurations abound within those two categories, including the ever-popular dot configuration, made using various colors and materials including standard plain or luminous paint, fiber-optic pipes and night sights. Having already decided the purpose of the pistol you are building will help in choosing the type of sights best-suited for your needs.
From there, it’s simply a matter of selecting the right sights for your particular model of pistol. For example, according to “The Complete Glock Reference Guide” by Lone Wolf Distributors Glock rear sights are divided into four heights from the factory: High (7.3 mm/0.29 inch), which are offered on the G17, G18, G19, G22, G23, G24, G26, G27, G31, G32, G33, G34, G35, G37, G38 and G39; Standard (6.9 mm/0.27 inch), which are offered on the G20, G21, G29, G31, G32 and G36; Standard (6.5 mm/0.256 inch), which are offered on the G17, G18, G19, G22, G23, G24, G25, G26, G27, G28, G33, G34, G35, G37, G38 and G39; Lowest (6.1 mm/0.24 inch), which are offered on the G17L G42, and G43. (The last two of which are narrower than other models.
Depending of which generation of sights you are working with the front-blade assembly is either held in place with a pin, a wedge or a screw. Note: some aftermarket front sights may be slightly oversize and may not drop into the slide. The fit may be tight, but now is not the time for gorilla strength—especially if you’re working with night sights—as they are easy to damage. Instead, use a file to fix this:
Lay a fine-grain file flat on your workbench and place the sight on top the file’s edge to gently cut/reduce the sight’s post one side. Then, rotate the sight 180 degrees and repeat the process. Be sure to turn the sights 180 degrees each time and that you glide the sight down the entire length of the file as doing do prevents the likelihood of uneven cuts in the front-sight post. Periodically check your work (test fit) until the sight until it snaps into the corresponding hole in the slide.
Next, use a straight edge (such as a ruler) and place it along each side of the slide to make sure the sight is straight—not canted.
Then, invert the slide on your workbench and replace the retaining piece. (Note: for the earlier generations of sights, use a pair of pliers or a hemostat clamp to place the pin or wedge between the retaining flanges, and then use a punch and small hammer to gently tap it into place.)
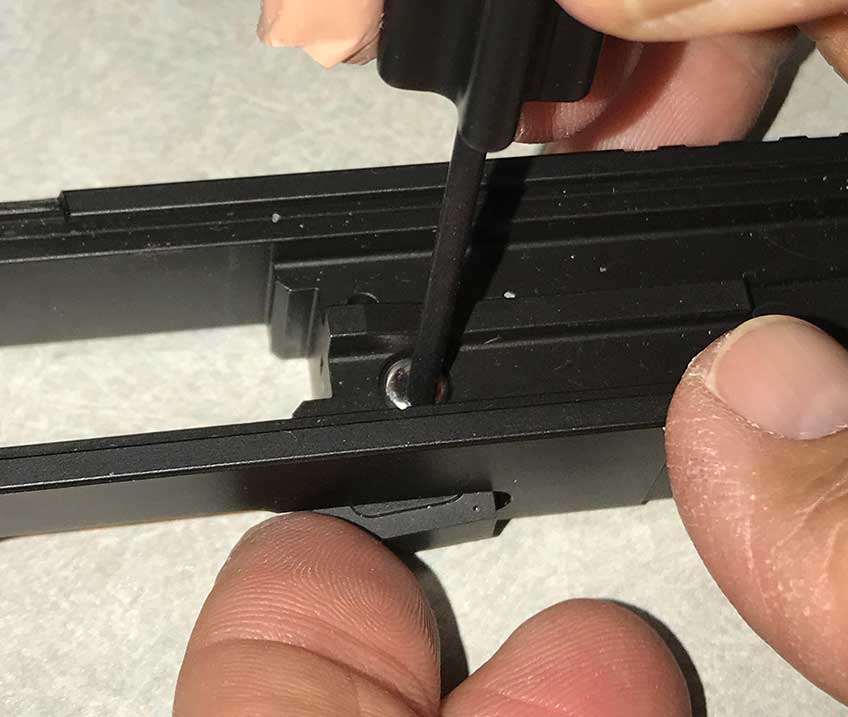
For the newer generation of sights that feature a screw to hold the blade in place, add a drop of Loctite #242 to the tip of the threads before tightening the screw. Finally, double-check the front sight’s alignment with the straight edge and verifying the screw is snug (but not too tight) before allowing the thread-locking compound to cure for 12 to 24 hours.
If, however, the assembly shifted, you can repeat the process or—if you’re careful—use tape to mask the top of the slide and sides of the slide. Next, gently secure the slide in a vise and then use a pair of pliers to true-up or straighten the front sight (though I don’t recommend it).
Rear Sight Installation
Whether you choose to use a non-marring dowel or a sight pusher, your rear-sight assembly should be installed from left to right. The Glock rear-sight dovetail is designed to be narrow toward the middle and wider toward the end. The purpose of this is as a sight it pushed into place the sight is ultimately crushed to fit. While this typically poses no installation problems for plastic- or hollow-base metal sights, much like the front sights some rear sights can also be oversize, and will require fitting in a similar fashion.
Test fit your rear sight into the left side of the dovetail. (It should easily slide about a quarter of an inch. If so, simply drift or push it the rest of the way.)
If not, use the same filing process as previously mentioned for fitting the front sight to the rear assembly, making sure to turn the sights 180 degrees each time and that you glide the sight down the entire length of the file as doing do prevents the likelihood of uneven cuts along the rear-sight base and repeating the process as needed until the rear sight can fit partially into the dovetail and be drifted with a non-marring punch or pushed into place.
When you’re finished, examine the rear-sight assembly and dovetail and make sure the sight is centered.
Having completed this, your slide is complete and the pistol can be reassembled.
The next installment will cover the particular components and the thought process that went into this particular build.