Working on other people’s guns over the past decade has taught me that we all approach cleaning and maintaining our firearms differently. If the AR-15 rifles coming into my shop are any indication, some folks are confusing the unloading and clearing of their firearms with actually cleaning the guns. I find myself appreciating what the armorers and gunsmiths who supported me in the Army suffered through on a daily basis.
The truth of the matter is that, just like any other mechanical device, our AR-15s need to be maintained to work well when needed and outlast us in the long run. While revolutionary new parts coatings, materials and lubricants can extend the time between major cleanings and inspections, they still do not a maintenance-free AR-15 make. Metal parts that rely on close tolerances to work in concert with each other—especially under high pressure and heat—are happiest when free of heavy gunk, corrosion and debris. While you are cleaning, you can also perform a few simple inspections to catch potential problems before they cause you grief during trigger time.
A good bore scrubbing after use should be standard practice. Use a one-piece rod or bore snake if possible and if not, avoid segmented rods made of steel to prevent the lips at each joint from prematurely wearing inside the barrel. Bronze or bronze-coated bore brushes are abrasive enough to remove most fouling without damaging the bore. They work best in conjunction with a good copper solvent like Hoppe’s Number 9 or Shooter’s Choice. These cleaners are safe for barrel steels and coatings, so you can let them soak in the bore while you work on other parts.
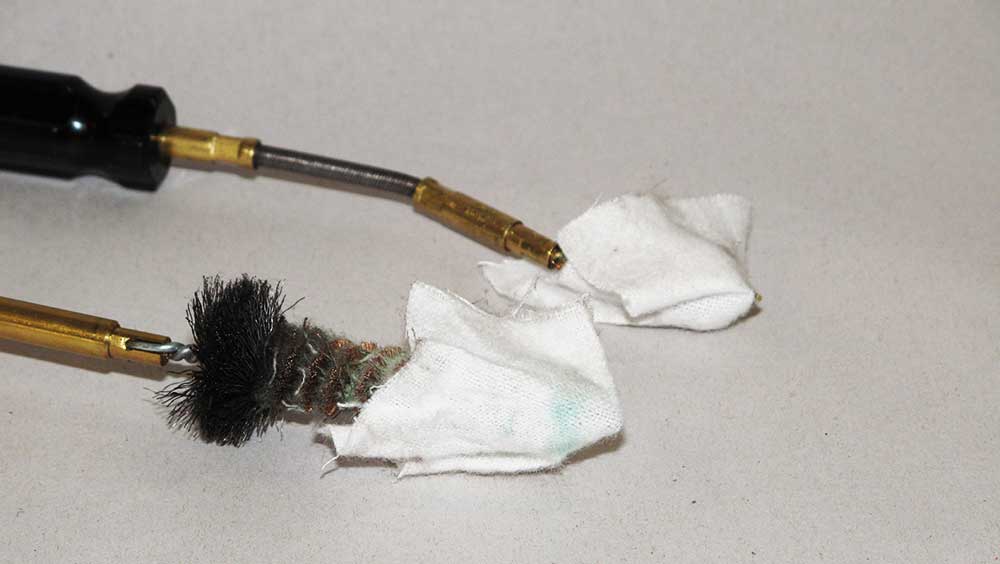
If possible, use a bore guide in your receiver to help keep the rod aligned. Your bore brushes should be tight but not so much that they cause you to bend the cleaning rod on the push stroke. Replace your bore brushes once they wear to the point where they seem loose in the barrel. Once the solvent has had a few minutes to work I swab the bore with clean, lint-free patches and then follow up with a solvent-soaked patch. I leave this second dose of solvent in the bore for at least 20 minutes before swabbing the barrel until dry patches come out clean. If you keep getting signs of carbon or copper, repeat the process as needed. Whenever my gun will be stored, I run a lightly oiled patch through the bore to help prevent corrosion.
AR-15 chambers need cleaning, too, particularly if you shoot lacquer-coated, steel-cased ammunition. Even regular brass-cased ammo fouls a chamber and can cause a buildup on the inner walls over time. I use an old bore brush, wrapped in a shotgun-sized patch which has been wetted with solvent to scrub out my chambers. After letting the solvent soak for a few minutes, I follow up with clean patches. Use a rag to wipe out the inside of the upper receiver to remove the major gunk and carbon deposits. A few cotton swabs will help you clean out the locking lug recesses in the barrel extension (just aft of the chamber).
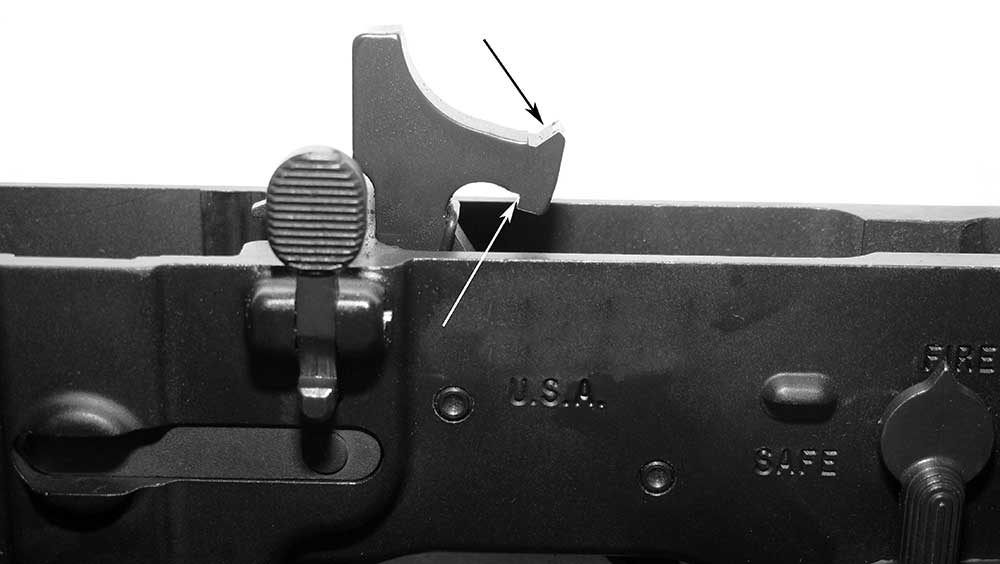
Inspection Point No. 1: Check the locking-lug recesses for any large debris that would impede the bolt’s locking lugs fully engaging. Large pieces of brass, blown primers or environmental junk all need to be removed.
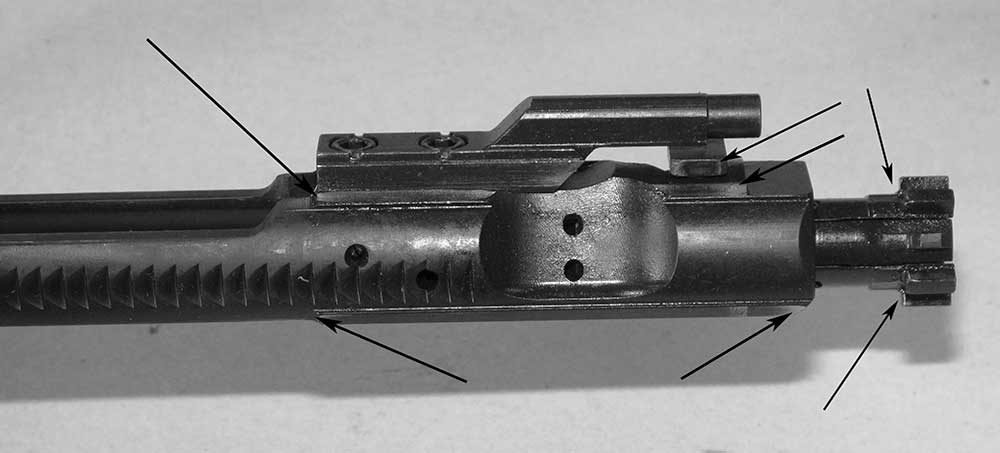
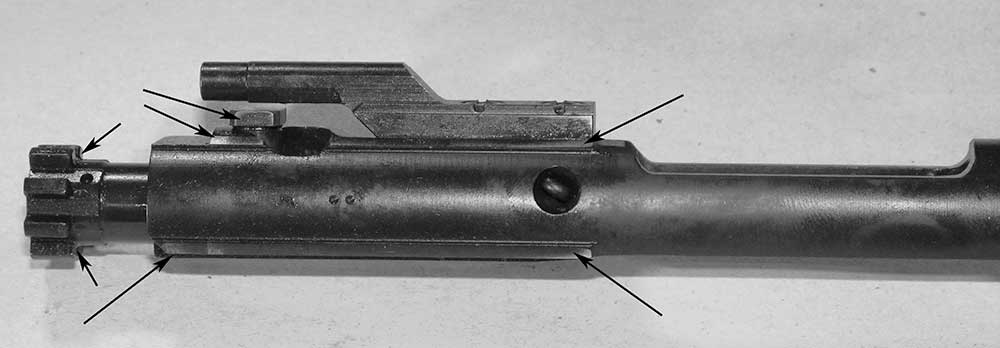
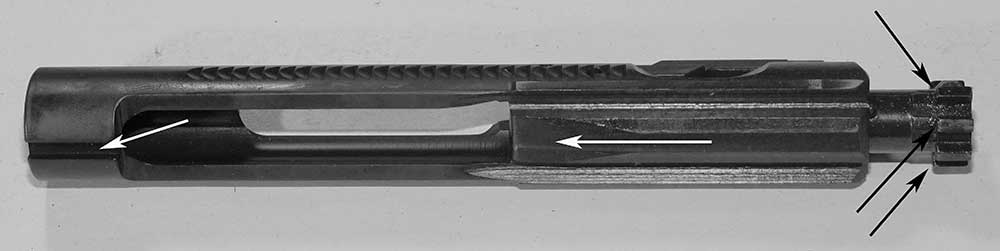
When I am cleaning an AR-15 at the range or in the field, I just wipe excess gunk off the outside of the bolt carrier group (BCG) with a clean rag. But any other time I “field strip” the BCG down to its basic components for a more detailed cleaning. An old toothbrush is helpful to scrub carbon and fouling off the parts, again using solvent to help break things up. I use a clean rag to wipe down all BCG components, then a few cotton swabs to get into the tight spots. When cleaning direct impingement system parts, focus on the inside of the gas key, the cam pin slot, the inner bore of the bolt carrier, locking lugs, bolt face, the extractor and extractor cutout in the bolt.

A scraper of some sort (I use my old G.I. demolition knife) will make removal of carbon flaking from the rear “horn” area of the bolt body much easier. A light coating of oil on each of the BCG parts prior to reassembly will help them get along better during firing. A drop of oil on a sticky ejection port cover’s spring-loaded detent will help it snap in and out of the upper receiver smoothly. Likewise, a few drops of oil along the sides and top of the charging handle and also at the latch will help prevent binding.
Inspection Point No. 2: The entire BCG needs to be checked for wear periodically. Look at your bolt’s locking lugs to ensure none are chipped, cracked or missing. Check the bolt body at the cam pin hole to ensure it is not cracked. Inspect the firing pin tip for pitting or erosion—it should be well rounded and smooth. The extractor groove should be clean and not chipped or burred and the extractor spring (and buffer, if present) should be in place and not bent or mashed out of shape. The firing pin retaining pin should not be excessively bent and both legs/tines need to be intact. Verify that the carrier gas-key screws are in place and tight. Gas ring gaps should be mis-aligned prior to reassembly. Once the BCG has been assembled, the bolt’s gas rings should apply enough tension that you feel resistance when sliding the bolt back and forth inside the carrier.
I clean my AR-15 gas systems approximately every 1,000 rounds. Direct-impingement gas tubes are easily maintained by inserting a long [purpose-made] pipe cleaner wet with solvent into the tube, then following it up with a fresh pipe cleaner. The portion that extends through the upper receiver is easily cleaned with a couple cotton swabs. Carbon build-up on the inner surface of adjustable gas-block screws can be cleaned off with a wire brush after removing the screw(s). Operating-rod systems with removable gas regulators also benefit from occasional removal of carbon deposits. Follow the manufacturers’ instructions for cleaning them, as they tend to be unique. If your AR-15 has an operating rod that moves through a bushing in the upper receiver, a bit of lubrication on the rod where it passes through the bushing helps to prevent binding.
AR-15 lower receivers can often simply be blown out with compressed air or even swabbed out with Q-Tips to remove debris. If you use a sound suppressor regularly or shoot subsonic centerfire-rifle ammunition, the lower receiver may need a more-detailed cleaning. Removing the trigger and hammer assemblies will provide easy access in this case but be sure to pay attention to how they come out so they can be reinstalled correctly.
Use a swab to clean gunk off the sear and disconnector surfaces, then apply a good trigger grease like Shooter’s Choice High Temp Grease sparingly to the contact surfaces to help them interact smoothly. Place a drop of oil in the front and rear takedown pin detent channels to keep them sliding in and out smoothly. If your selector lever is hard to rotate, remove your pistol grip, selector detent spring and detent pin so the selector lever can be removed from the lower receiver. You may need to cock the hammer and apply downward pressure on it to free up the selector body enough to come all the way out. Clean out the selector detent pin’s groove and apply a drop or two of lube there, too. Clean the detent pin’s head before reassembling. Remember that many large-frame ARs also have their rear takedown pin’s detent and spring held captive by the pistol grip. Pay attention so the pins and springs go back into their proper holes when reinstalling the grip.
Inspection Point No. 3: Be sure to remove anything from the lower receiver that could get caught under the trigger assembly or that may interfere with proper sear operation. Brass flakes, dirt and primers can all cause problems here.
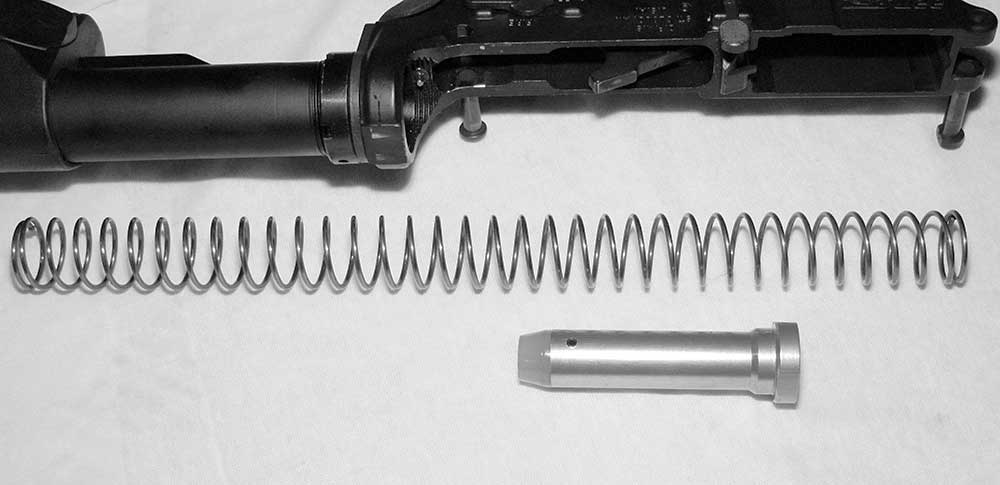
Remove the buffer and spring from the receiver extension and wipe them down. If the spring has a lot of black, oily gunk on it, use a dowel to push a rag or large patch into the receiver extension/buffer tube to clean it out, too. Oil the spring and buffer before reinserting them.
Inspection Point No. 4: Check the buffer retaining pin for damage. If it is slightly rough, you can smooth it with a small round file or some abrasive cloth. If it is heavily worn or if the tip is broken, it should be replaced.
AR-15 buttstocks, pistol grips and fore-ends do not usually require maintenance except to ensure their hardware remains fully tightened. Muzzle devices need a little attention from time to time, too. Suppressor QD mounts or threads should be scraped or wire brushed to remove heavy carbon deposits so that suppressors do not seize in place. Steel muzzle devices will keep rust at bay longer if they get an occasional light coat of oil. The same goes for any other phosphated/parkerized components on the AR-15.
Last and far from least, do not neglect your magazines. These critical components often get abused and ignored but wiping off excess carbon from the follower helps them function. An occasional disassembly and wipe-down of the inner mag body and spring also go a long way towards extending its life. I have a pair of G.I. Colt 20-round 5.56 NATO mags that have been serving me without fail for over 30 years—and I was not their first owner.
Avoid lubes that tend to gum up over time, like WD-40 and some of the fancier organics. My personal approach to AR-15 lubrication is pretty sparse. In addition to those points already mentioned, the ends of each rail on the outside of your bolt carrier, the cam pin, locking lugs and gas-key opening all can benefit from a drop of oil. As a rule, I do not lubricate the insides of my magazines. The exception is when I will be working in a wet environment.
Frequency of AR-15 cleaning depends on how fouled it gets during use and how soon you plan to use it again. Although I test AR-15s every week, I seldom shoot my own. So whether or not my guns are heavily fouled, I clean the bore, chamber and BCG each time I come back from shooting. If I do a lot of suppressor work or have a particularly heavy range session, I go in deeper. Shooters practicing several times a week can get away with a quick wipe-down of the major components and a brief barrel scrub each day, followed by adding some lubrication to moving parts. A good cleaning at the end of the week will keep fouling from snowballing into a problem.
I am not a big fan of hosing down my guns with oil to the point where it runs out of every orifice. If you have no time to clean because of the pace of your shooting, heavy oil will probably help for a while, but it also adds to the sludge and draws additional debris into the mix. Regardless of your level of use, a thorough cleaning every few hundred rounds is good for your AR-15.
I recently spent a solid hour removing large, hard chunks of carbon from the chamber area of a customer’s AR-15. This was not a detailed cleaning. I simply chipped, scraped and picked my way through the big stuff until I could verify that the ramps, raceways and barrel were still there. The rest of the rifle took another hour to clean. Unless you are keeping your firebase from being overrun in some distant land, your AR-15 should not be that funky. Even in that predicament, starting the event with a well-maintained firearm will give you one less thing to worry about.