Towsley hit the nail on the head when he wrote, “Installing the front pivot pin is simple on the surface and aggravating in reality. If you are going to attempt this without the correct installation tool, make sure there are no children present because this job will make even the Pope cuss like a drunken sailor.” The truth aside, in reality, his words only scratch the surface as to how much of a pain in the ass it is. For those of you who aced setting the bolt-catch roll pin and desire more of challenge, look no further. The necessary parts and tools are listed below:
Parts
Pivot pin Pivot-pin detent (On second thought, you may need some spares)
Pivot-pin-detent spring
Tools
Brownells or Wheeler Engineering AR Pivot Pin/Roll Pin Install Tool
3/32-inch-pin punch
(A big jar swollen full of swear words)
This can be done with just the pin punch, but it’s not pretty. You must compress the detent and spring and then insert the pivot pin. Sounds easy, but it’s not. The detent and spring will fly out and you will be spending a lot of time on your knees looking for them.

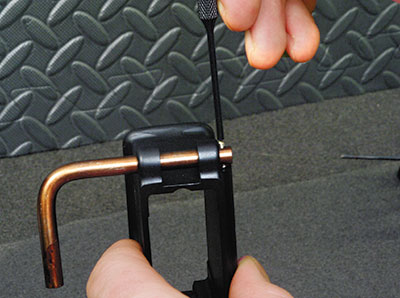
Brownells sells two tools for this job. (So does Wheeler Engineering.) One of which will reduce your swear words by about half, as it requires a learning curve. This is simply a rod shaft with a hole drilled in it. It works well in theory, but execution requires you can chew gum, walk, talk, text and dance all at the same time. I apparently cannot. Trust me; whichever manufacturer you choose, you want both. It costs more, but it works much better. Install the rod from the left and rotate until the hole is lined up with the hole in the receiver. Next, insert the spring and detent. Push them into the receiver using the roll-pin install tool or a 3/32 pin punch until you can rotate the rod to capture the detent. Now, slide the pivot pin in alignment with the rod—with the slot toward the detent—and push until you hear the detent click into the slot. Remove the rod, because your pivot pin is now captured in place.
Of course, it pays to use the right tool for the right job. (I mistakingly used Wheeler's Roll-Pin Starter Punch to trap the Pivot Pin Detent in place. As a result, emergency surgery was needed to drill though the starter to free up the detent. Fortunately, the receiver, detent, starter are all expected to make a full recovery—despite the AR owner needing a local—thanks to Doctor's Thomas and Grazio.)
As long for a function check here, as success can be determined at a glance and the push/pull action is self explanatory.
The next entry will cover assembly/installation of the trigger group.