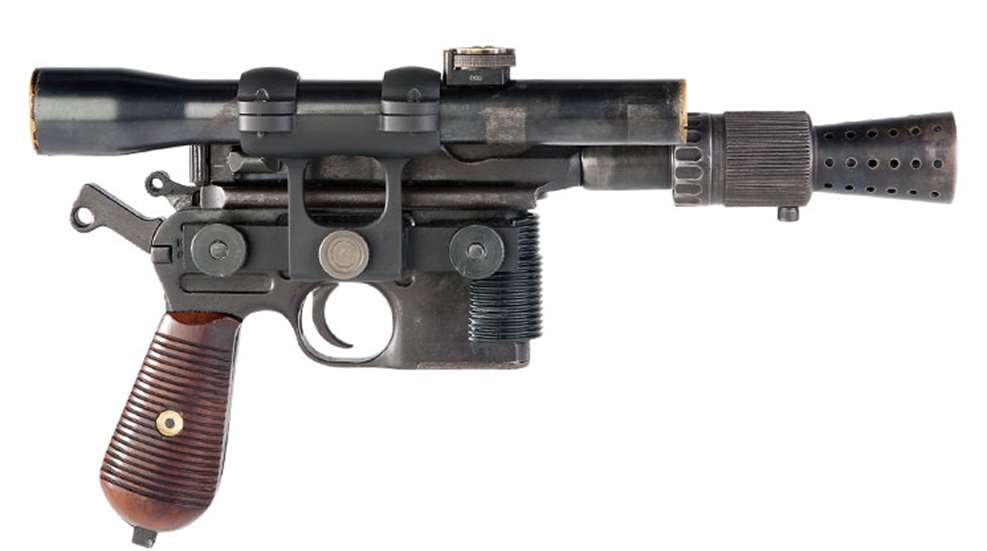
The 2013 holiday season was quite joyous for sci-fi film fans when one of the most-iconic prop guns—the blaster Harrison Ford wielded as the galactic smuggler turned hero, Han Solo, in "Star Wars: The Empire Strikes Back" and "Return of the Jedi"—went to auction a mere four days before Christmas. Fetching $200,000, the nonfiring replica undoubtedly made a heck of a stocking stuffer for one lucky earthling, who wished to remain anonymous. While I can understand wanting to own something used by a particular movie star or in a particular film, I have a hard time wrapping my brain around paying six-figures for a paperweight, particularly when it doesn't even emit colorful bolts of matter-disintegrating light—or have the ability to fire live ammunition, like the one I built for a fraction of the price.
As a kid all of 5 years old when "Star Wars" first graced the silver screen in 1977—the original, best version when "Han shot first"—I knew what my father meant when he leaned over and whispered, "That's a Broomhandle Mauser," which kindled my fascination for the pistol with the funny-sounding name and ultimately planted the seed for this project. It ignited not only a childhood fantasy to possess a blaster like Han Solo's (who is arguably the coolest character in the "Star Wars" franchise) but, more importantly, it provided nearly four decades to cultivate the gun-related grey matter to determine exactly how to make a truly better blaster.
To produce such a cinematic semi-automatic sidearm of quality, a worthy, working specimen is needed. While some would settle for nothing less than a pristine pistol, despite being my first handgun purchase, I knew enough to search for a diamond in the rough—a pistol that may not warrant anything more than a passing glance, much less a screen test. Unfortunately, the "parts gun" I procured as my first pistol couldn't memorize a basic function test. Sure, it was good for one round, maybe even two, but after that it malfunctioned like a droid smitten by the silica-based landscape of planet Tatooine.
Armed with a detailed technical manual I found online (which was essential—especially for a handgun containing a single screw) it took several weeks of sporadic tinkering through trial and error, until I was able to determine the problem was twofold: First, what seemed to be a bargain was actually a "parts gun" comprised of components from both C96 and M1930 variants. Second, the pistol's many mismatched parts included a worn bolt-locking block, which integrated the pistol's fire controls with its barrel extension. The part was coming loose from the lock-mechanism frame during recoil and causing the sear not to reset despite complete extraction of the fired case, a fresh round in the chamber and the bolt being in battery with a fully loaded magazine of 7.63x25 mm Mauser ammunition. As a result, I contacted Senior Curator of the NRA National Firearms Museum, Doug Wicklund who referred me to a Broomhandle aficionado in Dallas, TX to complete the recitation.

With repairs complete, I focused on learning about each of the components that gave Solo's blaster its eye-catching aesthetics. One online source claims the British prop house (Bapty & Co.) reused a heavily modified Broomhandle originally used by Frank Sinatra in the 1966 movie "The Naked Runner." In that film, Sinatra plays a former World War II sharpshooter armed with a C96 Mauser that breaks down to fit in a briefcase. A barrel extension was threaded to interface with the pistol to form a carbine-length barrel assembly. The gun also featured a scope base bolted to the left side of the receiver. When the time came to build the Han Solo blaster for "Star Wars," the prop house used the barrel and barrel extension from "The Naked Runner" and discarded the carbine barrel, the scope and wooden stock. In addition, receivers were swapped for one containing a similar scope base on the opposite side of the receiver.
Another website suggested the nozzle from a fire extinguisher was used to form its flash hider, while another one alluded to the cone-shaped muzzle device of a World War II-era German MG81 machine gun. The latter seem most likely, especially considering the optic, a Hensoldt & Wetzlar Ziel Dialyth 3X riflescope was also war surplus and of the same manufacture. The piece that proved the most difficult to identify was the scope mount. I suspected it was German-military surplus as well, then I discovered the scope base and mount was custom made by Bapty & Co.
The first part came from the most unlikely of sources: Brad Ferguson, who supplied me with components for my project to build a live-ammo-firing "Man From U.N.C.L.E." Special, referred me to Ed Maggiani, a fellow spy-fi/sci-fi enthusiast created a CD for me containing images of the actual prop used in "Star Wars", film stills and blaster specifications. He also suggested another website, the replica prop forum (or RPF, where members produce props from various forms of media: comics, films, TV shows), as another source of invaluable information for my project. To describe it as the epicenter of the replica prop community would be an understatement of cosmic proportions. It was there I found a 68-page forum thread authored by Carson Case and Pat Matera (also known as Deadbolt and Kpax) who spent 18 months studying every detail and dimension of the original prop by examining every photo, screen capture and sketch with a level of scrutiny that would make crime-scene investigators envious. Matera had a reproduction, steel MG81 flash hider, which he sold to me for $75. (Unfortunately, the flash hider consists of two separate components, and he only had one, but more on that later.) Then, armed with CAD drawings of the parts, they hired a machinist with a CNC machine and fabricated a limited run of kits (comprised of aluminum and steel components) designed for use with either real or replica C96 pistols. After seeing their scope mount, I quickly realized it had something mine did not. In addition to more closely resembling the one used in the film, the crossbar base that mounted directly to the frame featured a reverse dovetail, which offered ample support for the added weight of the steel mount and optic. Once installed, a thumbscrew anchored the pieces together. Adding spring washers on each bolt between the base and chuck nuts—and another behind the thumbscrew that held the scope mount to the crossbar base—provided a welcome ounce of prevention to ensure everything stayed tight once the lead started to fly. Prices varied, but for roughly $800, in the end I had a supply of quality parts and the dimensions I needed.
The correct type of scope came from another RPF member in Germany (cost $800), and with the help of a former coworker I successfully managed to "sweat" its original claw-style mounts free from the scope's tube by applying a judicious amount of heat using a torch. Matera informed me that Alex Wakal, of Dreadnaught Industries—another RPF member—was in the process of building his own live-fire Han Solo blaster. Originally, I contacted him prior to the completion of the parts kits to inquire about fabricating the scope base and mount for me. To my surprise, he was forced to back burner the project due to the growing popularity of his gunsmithing business, which worked to my favor when he offered to sell me his pistol and all its customized components (a bargain at $850). The deal provided me with the scope base and mount I needed but, more importantly, it included an actual C96 Mauser to use on the project, instead of the mismatched "parts gun" I originally intended for the build. Moreover, the frame was already drilled and tapped for the scope base and mount. While the other pistol brought my goal closer to fruition, its arrival brought with it some ideas for possible improvement.
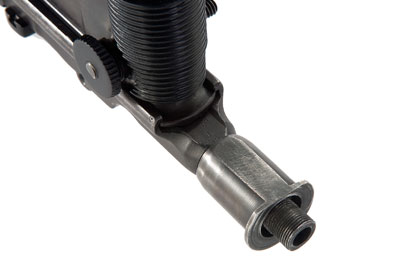
Its barrel was cut to just before it tapered, and the cosmetic bull-barrel extension and flash hider slid loosely over the pistol's truncated tube. Besides not being sized to scale, the assembly was held in place by a single setscrew that interfaced with a small flat located on the underside of the barrel. In its present configuration, the barrel sleeve wouldn't remain in place under the forces of recoil. To remedy this, I sent the pistol's cut-down barrel assembly, along with one of the MG81 flash hiders to my gunsmith who in turn, machined a bull-barrel with an inner diameter that fostered a snug fit before permanently installing it. The part spanned slightly more than an inch past the breech and featured a flat that spanned the entire underside of the cosmetic extension, a necessary addition for removing the frame from the barrel during disassembly. Similarly, the end of the bulky sleeve formed a large flange, on the other side of which was a counter-bored recess surrounding a .5-inch protrusion of barrel, threaded to 1/2x28 TPI. While the flange served to offset the noticeably larger diameter of the MG81 flash hider, there was still the matter of how to attach the muzzle device to the barrel.
The large, hollow chamber on the breech end of the flash hider contained internal metric thread, which is extremely difficult to match even for a skilled machinist with a compatible lathe. Then, there was the matter of compensating for the large hunk of steel on the end of the barrel—not to mention the malfunctions that could result due to the excess mass attached to the end of the barrel. A device known as a linear inertial decoupler (LID) remedied the problem. Some suppressor manufacturers utilize such technology in their products. Others offer LIDs designed to thread into the back of suppressors for the purpose of enabling pistols with certain action types to cycle properly when the weight of the suppressor is added to the end of the barrel. Best of all, I had a leftover LID from my "Man From U.N.C.L.E." project, which dropped right into the rear hollow channel of the MG81 flash hider. My gunsmith simply installed a captive nut on the inside near the muzzle with which the externally threaded portion of the LID could interface by means of a custom-made wrench. The addition of a spring washer ensured the muzzle device wouldn't loosen under recoil. Once the barrel modifications were complete, the flash hider installed with suppressor-like ease. Was it absolutely necessary? Perhaps not, but ever wonder why the action sequences in the film only show one round being fired? In short, a LID ensures smooth operation. The only thing left to do was determine the best way to secure the scope mount to the frame.
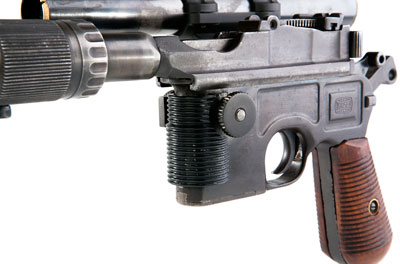
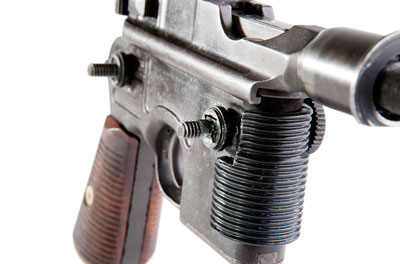
When it came to integrating the scope mount, Wakal's approach was to keep the components removable. Once the frame was drilled and tapped, he bonded the chuck nuts to the mounting bolts, thereby transforming the bolts into thumb screws for easy attachment and removal. Yet, I viewed it as problematic because the thickness of the pistol's frame was a mere 0.1060 inch, which only left enough room for two threads for each bolt. In its present configuration, there wasn't enough frame material to support the hardware or the optic. Moreover, as a live-ammo-firing prop, the mount had to be able to withstand the forces of recoil. So, the matter became how to build up the frame in order to permanently affix the bolts.
A friend within the firearm industry (who also happens to be a welder) suggested steel captive nuts would solve this problem. In addition to resembling the spacers used on the original prop, TIG welding the nuts to the frame and subsequently welding the studs to the nuts created the rock-solid surface I needed. Which design is most like the original? Who's to say; while aesthetics are important, my chief concern was more about the bang and less about the bling.
However, that's not to say aesthetics took a backseat. The little things that make up the Han Solo blaster are of equal importance, so much so they have their own word in the prop-making community: greeblies, which is defined in Industrial Light and Magic founding member Lorne Peterson's book "Sculpting a Galaxy: Inside the Star Wars Model Shop" as, "miscellaneous mechanical details that add realism to a prop, model or set." There are heat sinks (commonly referred to as the grill) that wraps around the front edge of the blaster's magazine well, a circular-shaped silver disc on the left side of the magazine well, which some theorize wasn't adornment but a mere reflection from a camera flash when the prop was being photograph—hence its innocuous name "the mystery disk." There's even debate that one of the Solo blasters made for the film contained a front sight, and whether it was flanked on each side by two rods with conical-shaped tips or "antennae." While Case and Matera's kit contained such accoutrements, I opted not to install the front sight since its presence on the original prop wasn't totally confirmed, and I was uncertain how to permanently affix the antennae so they wouldn't be jarred loose by recoil.
To describe shooting the live-ammo-firing Han Solo blaster as a fulfilling or a rewarding experience would be grossly understated. Minimal recoil and the absence of malfunctions left me craving a supplementary means of celebrating my firearm-oriented finale, whether it be the funky tones of Figrin D'an and the Modal Nodes, the urge to send out a casting call of storm troopers clad in their black-and-white best, or, perhaps targets of joyous Greedo green. Although the scope's glass and German # 1 recticle was intact, its short eye relief made it impossible to sight through while shooting, not that it matters. This pistol is meant to function more as a cap pistol for adults. My only gripe involves the lack of a silver-screen worthy muzzle blast, but I suspect that can be overcome though judicious powder selection and spending some quality time at a loading bench.
"Hokey religions and ancient weapons are no match for a good blaster at your side, kid." But having a blaster that is not only a replica of one of the most iconic sci-fi props in cinematic history—one capable of firing live ammunition—now that gives you the means to back it up.


