Whether you shoot iron sights, carry optics or a combination of the two, or train for combat or competition, the critical balance of speed and accuracy cannot be overstated. Why is striving for a textbook sight picture the worst thing you can do when held accountable to faster speeds with accuracy? What untapped magic lays dormant behind the classic trope of a “bad sight picture” that, when engaged, affords accuracy at faster speeds?
Build the Shot
Under the duress of on-demand performance, you will be pressured into rapidly building the shot—a process by which you must bring stability to alignment. You don’t have all day, because you are being held accountable for time and accuracy, so you need to develop the skills to rapidly build the shot.
Covering the multi-faceted components and sub-components it takes to build a perfect shot exceeds the scope of this study. However, for brevity, suffice it to say that most of the work effort is to precisely align the muzzle as quickly as possible.
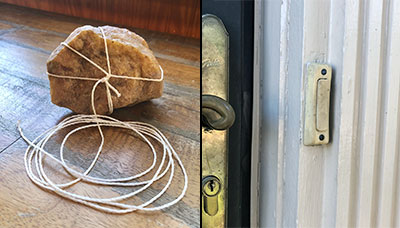
The two classical methods for describing the handgun draw stroke are what the late master instructor Ron Avery called “rock on a string” or “touching a doorbell.”
Rock on a string (violently throwing the muzzle out there with minimal control) is like tying a rock to a string, then throwing the rock at the target creating tension at the end of the string length. Its counterpart methodology is to imagine reaching to press a doorbell.
During the first part of the doorbell-press movement, you can move as fast as you want, but when you get closer to that doorbell button, you need to bleed off some of that kinetic energy and gain greater control as you drop speed. Otherwise, you will either miss the target or break your finger in the process.
Given the two mental images, rock on a string versus pressing a doorbell, which best describes a time-and-accuracy-efficient draw stroke?
The quicker you build the shot and move into proper muzzle-target alignment, the better the result. The greater your control and timing, the better your stability and alignment. Using this as a baseline allows you to unleash the potential of a “bad sight picture.”
Tactile vs. Visual
Part and parcel of any sight picture (“good” or “bad”), with dots or irons, is visual processing. However, before delving into the visual reference of a sighting system, when you bring the handgun up to your eyes (as opposed to dropping your head down to the gun), the first thing you pick up peripherally is the shape of the gun. This crude visual reference of a blurred object moving into your field of vision should be the very first item to enter your visual process.
The alignment process begins prior to your eyes referencing the sighting system itself. Often referred to as kinesthetic alignment, using only your proprioceptors affords you the advantage of establishing alignment as early as possible, prior to visual confirmation. The advantage here is that you’ve begun alignment prior to any specific sight reference. Here you are outside the context of “good’” or “bad” sight picture as this has not yet come into play.
What untapped magic lays dormant behind the classic trope of a “bad sight picture” that, when engaged, affords accuracy at faster speeds?
In effect, you have saved a tremendous amount of processing time by establishing a rough-hewn tactile alignment prior to picking up your sights, which are utilized later to fine-tune initial tactile alignment. Picking up a raw visual reference is what buys you optimal time, as opposed to beginning your alignment process only with the use of your sights once they are up.
Whether using irons or carry optics, the key learning point here is to establish alignment as early as possible by using only natural point-of-aim (NPOA), which is accomplished by body feel, kinesthetics, proprioceptors and the like prior to visual confirmation, which is applying your eyes to your sights to confirm the alignment you made by feel.
Immediately following alignment by feel (tactile), is getting your sights connected to the target in some manner (with irons, somewhere good enough for the technicality of that shot, and with a red dot, the dot visible anywhere in the window) at least even just seeing them in some way (visual).
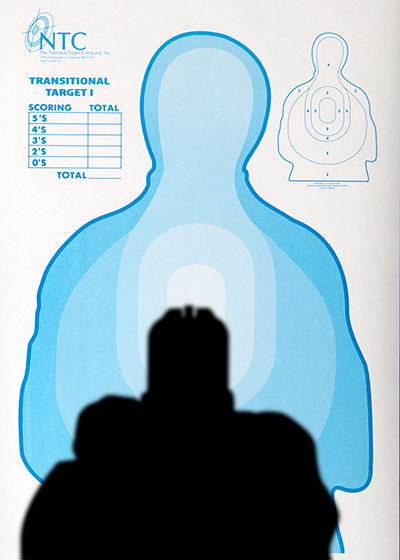
Several grandmaster shooters and master shooting instructors advise development of such alignment by feel by running a simple 3-yard drill.
Set up a paper target at the 3-yard line. Consider round placement anywhere on paper to be a good hit. Point your muzzle directly at the center of the target. Close your eyes. Press the trigger and then open your eyes. Where did the round place?
Next, set up at the same distance and then move the gun to the low-ready position (pointed at the base of the target) and now, with your eyes closed, move the muzzle to the center of the target and press. Where did the round print?
Lastly, set the same drill up again, except this time run it from the holster. Again, with eyes closed, present the handgun to the target and press off a round all by feel. Where did the round print? Running this same drill starting from three different positions helps you to develop that tactile reference by developing and maximizing your proprioception to engage in kinesthetic alignment.
Multiple-time world champion competitive shooter and master instructor Rob Leatham states that muzzle-target alignment is 70 percent body and 30 percent eyes (visual confirmation only). Combining tactile alignment (70 percent) with visual confirmation (30 percent) provides the skilled shooter with optimal balance of speed and accuracy.
Standing on the solid bedrock of a well-controlled presentation (doorbell method), with initial tactile alignment (70 percent) affords you optimal conditions for fast, effective visual processing.
Focal Plane
Positive target identification is the very first order of business. The initial part of your visual processing is to extend your focal plane to the target. Does this target require shooting? Whether in competition or in a combat application, if the answer is “yes” then only one of two things happens.
If you’re shooting irons, depending on the technical difficulty of the shot, you will draw your focal plane back up from the target you’ve just identified as a shoot target, toward your front sight post. If you’re shooting a dot, you must train yourself to leave your focal plane on the target while being aware of your dot position. Much easier said than done—especially at faster speeds.
Retired law enforcement professional and master-level competitive shooter Kyle Schmidt reminds his students that the sights are never immobile–the gun never stops moving. Novice shooters try to make the gun immobile as opposed to setting and monitoring an acceptable arc-of-wobble. Attempting to completely immobilize your sights only leads to massive frustration, as it cannot be done.
The sights move and will always move, your objective is to get them to move or wobble within what you consider to be an acceptable margin of error on the target. Here, a key learning point is that an acceptable margin of error is a higher priority than a “good” versus a “bad” sight picture.
Visual Confirmation
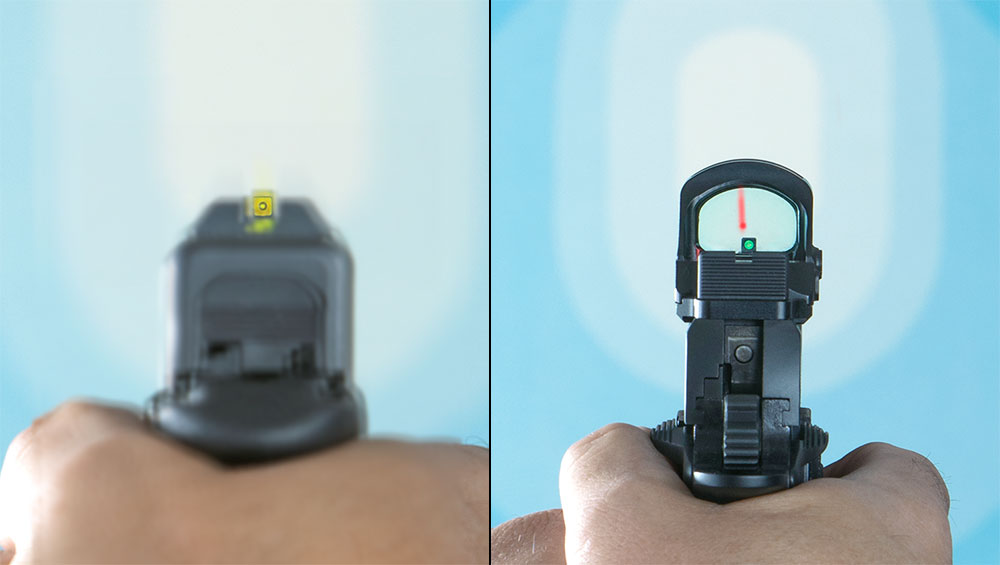
Crude visual reference is always faster than refined visual reference. If you’re shooting irons, you can reference the back or crude outline of the slide. If you’re shooting a dot, you can reference the carry-optic window housing. Either way, you are using your kinesthetic-alignment process to bring that peripheral blur into a raw alignment. In the process of employing this initial crude reference the sighting system eventually moves into your field of vision. The split second you begin to engage your sighting system is the split second you can start looking for a “bad” (or rather, “good enough”) sight picture.
The key learning point here is to eliminate any delay either mechanical or visual. Switching gears from 70 percent tactile to 30 percent visual should be immediate. Start by feel and end with immediate confirmation.
According to Avery, there are three visual confirmation options when using irons. Each depends on the technicality of the shot. One is to keep your focal plane on the target leaving your front-sight post and rear-sight notch blurry. It’s what Avery calls a “hard target focus.”
... if round placement is acceptable with “misaligned” sights and you were to take that extra tenth or more of a second to “correct” your sight picture, is it worth the exchange of time?The next option is to shift your focal plane from the target toward your front-sight post but not exactly on your front post, somewhere in between a hard-target focus and the front post. It’s what Avery calls a “soft target focus.”
The remaining option is to shift your focal plane from the target toward your front-sight post and set a sharp visual focus on the razor’s edge atop the blade of your front post. It’s what Avery calls a “hard front sight focus.” In some shooting circles, anything other than a hard front sight focus would be considered a “bad sight picture.”
Referencing carry optics and in addition to RDS mechanical offset, champion competitive shooter Max Michel describes three visual processing timesavers that confirm initial alignment. He uses the metaphor “Your eyes are the gas pedal for your trigger.”
The first is what Michel calls “a flash of color,” which is a something like a “tracer light” or “color blur.” It is the highest speed visual confirmation possible with a dot, yet good enough to confirm alignment on less-technical shots. Pressing off a shot the nanosecond you see that flash or blur affords you optimum efficiency.
The second is what he calls a “float” which is where the dot is “floating” within your acceptable arc-of-wobble margins. It takes just a bit more time (due to increased difficulty of the shot) than the flash of color, but not much. You’re not trying to land a drone here; you just want immediate confirmation.
Lastly, is the “settled dot” which is where the dot “looks like a dot” as opposed to a blur or a float. The dot has “stopped” (slowed movement), has shape and good form. Again, it looks like a dot and represents an RDS textbook sight picture.
Refined Visual
When running iron sights, the novice shooter is told of the importance of textbook sight alignment. The quintessential mechanically perfect sight picture comprises equal height with equal light and a hard focus on upper blade edge of front-sight post.
However, we’ve all seen the alternative variations of front-sight-post to rear-sights-notch “misalignment” configurations such as the front-sight post being too far left, right, down, up, front sight blurry, rear sight completely out of visual focus or any combination thereof. We are told of such sight misalignment maladies are the root of all evil when it comes to inaccuracy or poor shot placement. The truth of the matter is that it’s too general a statement to be applicable to every shooting scenario, every time.
Alignment precision is directly proportional to the technicality of the shot at hand. The more technical the shot, that is farther distance, smaller target size, target penalty (points in competition or shooting a hostage or innocent bystanders in combat application) and other target difficulties such as moving targets or a two-way gunfight, the greater your need for that textbook, precision iron sights alignment.
The inverse of this is also true. The closer you are to the target, or the bigger it is, or the lesser the penalty for a miss, etc., a greater margin of error becomes acceptable.
Picking up a raw visual reference is what buys you optimal time, as opposed to beginning your alignment process with the use of your sights.As an example, try running this mental picture exercise (or you can even run it on the range) Set up with iron sights in front of a large paper target about 3 yards away and point into the visual center of the target with your handgun. Consider it a good hit if it prints anywhere on paper.
Align your sights perfectly (textbook front sight post to rear-sight notch) with the center of the target and press off a round. In this example did your sight alignment result in acceptable shot placement?
Next, move your front-sight post to the right where it is pressed up against the right side of the rear-sight notch and take the shot. In this example did your sight alignment result in acceptable shot placement?
Now, move your front-sight post to the left where it is pressed up against the left side of the rear-sight notch and take the shot. In this example, did your sight alignment result in acceptable shot placement?
Then, try too far up, too far down and any combination of the above. In every one of the configurations and permutations at the very close distance, did your sight alignment result in acceptable shot placement?
In some shooting circles, anything other than a mechanically perfect sight picture would be considered a “bad sight picture.” However, if round placement is acceptable with “misaligned” sights and you were to take that extra tenth or more of a second to “correct” your sight picture, is it worth the exchange of time?
Backing into building the shot, first and foremost is to save visual processing time by using kinesthetic alignment followed by crude visual reference. Next is to adjust your focal plane according to your sighting system and as per the technical difficulty of the shot. Lastly, when applying refined visual confirmation, your eyes are the gas pedal.
Proficiency in shifting your focal plane (irons), splitting your target focus (dot) and using “bad sight pictures,” affords you a measurable increase in speed with accuracy.