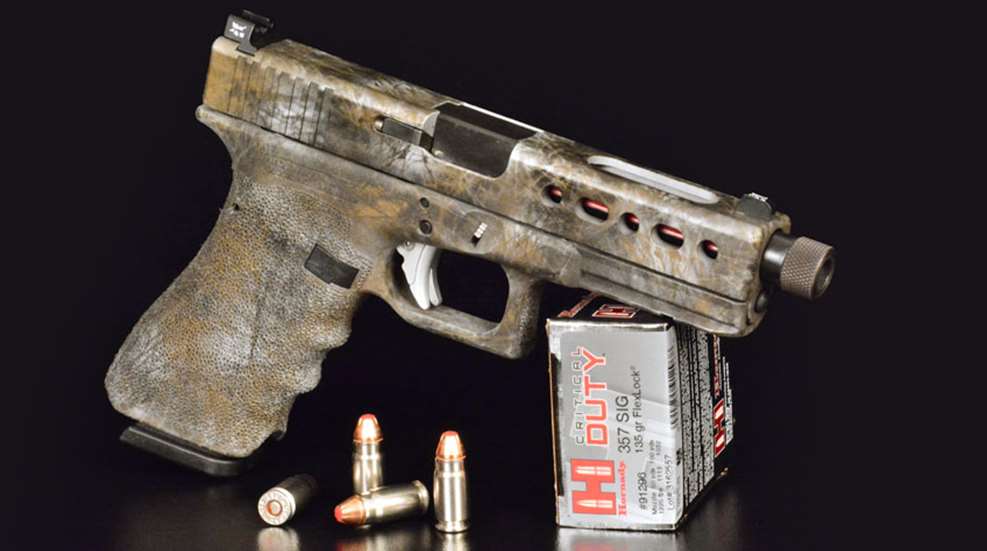
It’s easy to feel inadequate when you go to the range and see all the “tactical” looking handguns while yours is basic black and a little worn and shabby.
Any professional gunsmith would be happy to coat your pistol with one of the “in” colors such as flat dark earth, burnt bronze or, for the adventuresome among us, pink with fuchsia highlights. The trouble is, the cost is pretty high.
Fear not. Coating a handgun is a good do-it-yourself project for the advanced amateur. Most of the cost for a pro is in labor. I look at tinkering on guns as recreation, so the hours spent are really of no concern. You can have fun doing this and end up with a very cool-looking shootin’ iron.
All this applies to long guns as well. The main difference is that they require a bigger oven for heat-cured coatings.
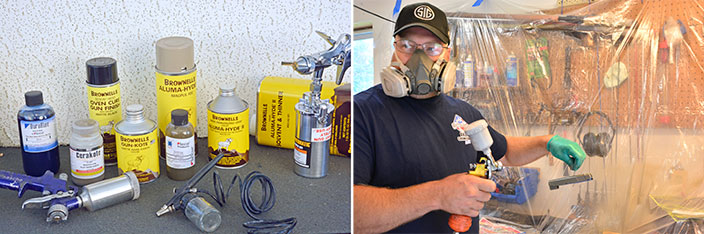
There is a wide range of spray-on coatings available. Some require oven curing, while others will air-cure. While I am covering the process used for heat-cured products like Cerakote, you may also consider a simpler approach with an air-cure product. Professionals believe that the most-durable finish is one that’s baked on, but one that dries at room temperature can hold up well. As you read on you will see that oven-cured products require more equipment. Do not be afraid to experiment with spray finishes that air-cure. I have used them for many years with considerable success.
Air-cure products I have had good luck with include Cerakote C, DuraCoat and Brownells Aluma-Hyde II. Some of them come in rattle cans for easy application. Others must be applied with a spray gun or airbrush. Cerakote C is a spray-gun-only proposition.
Bake-on products include Cerakote H and Elite, DuraBake and a couple from Brownells: Gun-Kote and Teflon/Moly. Cerakote and Teflon/Moly are spray gun only, while the others have multiple application options. The list goes on with a lot of other products on the market, but these are what I have some experience using.
The key to success is in the preparation work. Your best approach with any spray coating is to sandblast the surface, as explained later. However, if you do not have a sandblaster or even an air compressor, DuraCoat has a product called No-Sand that is said to eliminate the need for sandblasting when used with its air-dry coatings. I have not tried it, but it has a good reputation and the DuraCoat products I have used worked as advertised. No-Sand with air-dry DuraCoat, which is available in aerosol cans, may well be a good choice if your resources are limited.
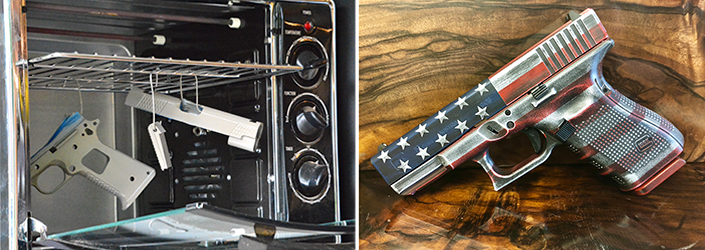
For handguns, you could do the heat-cured finishes in your kitchen oven. That works best for old and stinky bachelor, hermit types. To maintain domestic bliss, however, use a dedicated toaster oven in your shop or garage. Buy the biggest one you can find. Also, pick up an oven thermometer, as those built into the oven are not accurate enough.
Strip and Clean
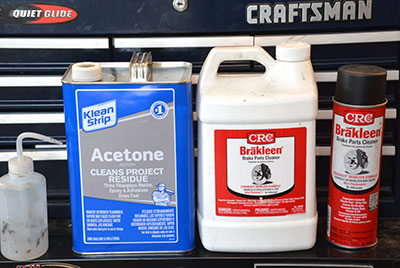
Strip the handgun down to parts. That includes removing the sights. Clean and degrease the parts using acetone or Brakleen. You must remove all dirt, crud, grease and oil. These solvents can be hard on some plastics, so be cautious with any polymer parts. After degreasing, do not handle the parts with bare hands, as fingerprints leave oil. Powder-free latex gloves are probably the best option.
If your gun is a “seasoned” firearm, you should remove any pits or scratches, or else those can show through the coating.
Of course, if there is any rust it must be completely removed or the coating will not stick properly. Once the parts are clean and prepped, completely degrease them again using a solvent that dries without residue. Brakleen is good, acetone is better. It’s probably best not to soak non-metal parts, but to spray and wipe with a clean cloth dampened with degreaser.
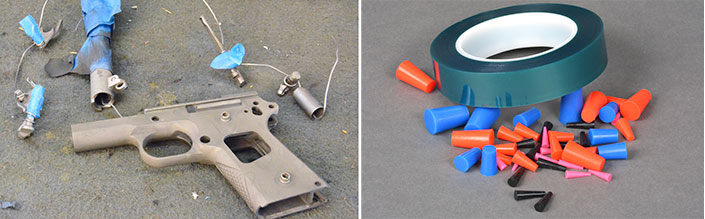
Tape off anything you will not be coating with painter’s masking tape. That includes the surface of any moving parts that are a critical fit. The slide rails for example, should not be coated. If you are coating the barrel, plug both ends. I use tapered silicone plugs. Be careful about where you coat, as this adds dimension. For example; coating a 1911 barrel where it’s visible in the ejection port is fine; coating where it fits into the bushing usually is not.
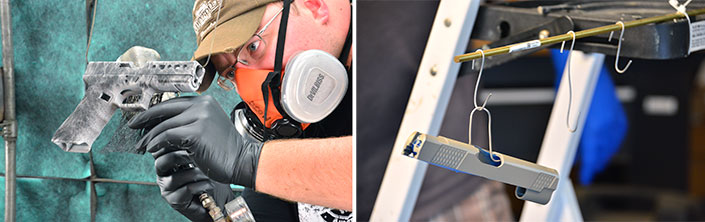
Now is a good time to figure out how you will hang the parts in the oven. They must hang so nothing touches them. You can shape wire hangers to hang from the top shelf. I have some magnetic hooks that hold on the top of the oven and give me more room than leaving a shelf in place. (Plan this all out ahead of time. Standing in front of an oven with wet paint on the part is not the time to figure out how to hang it. You will also need a way to hang the parts in the work area to flash off, before cooking. So, plan that all out in advance.)

Blast Away
Each part will need to be sandblasted with 80- to 100-grit aluminum oxide. Use 80 to 100 psi air pressure for the metal and 30 to 40 psi for non-metal parts such as wood, fiberglass, plastic or polymer. Anodized aluminum parts will require only 30 to 40 psi. There is no need to remove the anodizing, but you must resurface it.
After blasting, nothing should be shiny. There should be an even, matte appearance. If there are shiny spots on any part, hit it again.
The idea is to rough up the surface and give it “tooth” to help the spray coating adhere to the part.
There are a few ways to do this. If you have a local shop you trust, take the parts to them. A blasting cabinet works best, and most metal shops or gunsmiths will have one. It’s worth paying them a few bucks to sandblast the parts.
Table-top blasting cabinets are not all that expensive, if you have access to an air compressor. Or, you can get by with an inexpensive gravity-feed sandblasting gun. Before I bought a blasting cabinet, I used my handheld sandblaster over a cut-off 55-gallon plastic drum to capture some of the sand for reuse. Of course, you can consider the abrasive a consumable and just buy more. Either way, do this outdoors, as you don’t want the abrasive dust in your shop. Always wear a respirator, safety goggles and heavy gloves. Don’t think you can get by without the gloves. Sooner or later you will mess up and blast your hand. Without gloves it hurts like hell. I know this for an absolute fact.
After blasting, remove the tape and, if you have a compressor, blow all the sand off the parts. Degrease the parts again; making sure all sand or dust from the sand is removed. Again, protect sensitive areas with tape. If you are going to heat-cure the part, use a high-temperature tape. Regular painter’s masking tape cooks on and can be difficult to remove. Wear gloves to avoid leaving any fingerprints.
Cerakote recommends baking uncoated metal parts for an hour at 300 degrees to “gas out” any solvent or oil. Non-metal parts should be done at a lower temp, say around 150 degrees. This helps identify any hidden pockets of grease or oil.
Spray and Pray
Cover up everything you don’t want painted, like walls, floors, tool boxes, kids, dogs, etc., with drop cloths. I buy the cheap plastic sheets designed for one-time use (but don’t use these for kids or pets). Another approach is to hang the sheets from the ceiling to make a small, isolated paint booth. The trouble with working in the shop without an evacuation fan is that the air becomes filled with atomized paint, which is bad for you. Always use a good respirator when spraying.
In good weather, I often spray outdoors. I have a couple of metal shepherd’s crooks sold in lawn and garden departments. I stick them in the ground outside my shop, preferably in the shade, and hang the parts to do the spraying there. I do not let the parts hang outdoors, too many bugs. I take them inside to flash off or hang dry. This process is less than ideal, but it keeps the mess to a minimum and the air in my shop healthy. Of course, rainy days and wintertime are a problem. If it’s not too cold, it works OK if you warm the part a little, step outside to do the spraying and then get back inside in just a few minutes.
For Cerakote and most other spray-on products you will need a high-volume, low-pressure spray gun and a compressor. You can use an airbrush with canned propellant for some coatings such as DuraCoat. Check the directions of your preferred coating.
Make a few practice runs on scrap cardboard with the sprayer so you will know how to get the best results. With a spray gun or air brush, adjust to the recommended pressure and spraying distance for the product you are using. It may take a bit of experimenting with the mix of air and paint to get it right. You want a nice, even, thin coating. If you use too much liquid, it will look like paint, not a firearm finish. It will also be subject to runs, which means you will have to wash it off and start over. If you have too much air and not enough material, or you are too far from the piece being coated, the atomized paint can partially dry before it coats the metal. This results in a rough, matte-finish look that is not durable. So, practice, practice, practice, then spray your gun.
Gone in a Flash
Most of the oven-cured products require a little hang time to flash off some of the chemicals before you put the coated piece in the oven. The key is to hang them free from touching anything. One little bump or brush and you will have to do it all over again.
A word on that: Always keep a bucket with solvent ready for goof-ups. You will have a few, so use the recommended solvent and remove the defective spray coating. Most products recommend that you blast again after washing off the part with the solvent.
Now We’re Cooking
Just like baking a cake, pre-heat the oven to the temperature recommended for your product. Carefully place the parts in the oven and set the timer. Remember that metal is baked at a much higher temperature than polymer. If you are doing a polymer handgun, use the temp recommended by the coating maker. Cerakote recommends metal at 250 or 300 degrees, depending on the product, while polymer or wood is baked at 150 degrees.
Let the parts cool. With most oven-cures, you can start putting the gun back together as soon as the parts are cool enough to handle. Air-dry will need a few days, or longer, to cure.
Once you have the gun back together, make sure to lubricate all moving parts. Also, any exposed metal must be coated with oil or another protectant to prevent rust.
Then, head to the range and strut a little as you show off your now-stunning handgun.