Malfunctioning AR-15s elicit a variety of reactions from their operators. Competitors curse their frustration into the stress-filled air as they watch hard training and preparation vaporize. Target shooters and plinkers struggle through problems in hopes of salvaging their precious range time. Hunters watch helplessly as the objects of yearlong preparations are spooked into the next county.
Worst of all are the potential results of a malfunction on those relying on their arms for protection of life—home defenders, law enforcement officers and military personnel. The “click heard ‘round the world” they sometimes experience is followed by a rapid—and hopefully successful—application of the immediate action needed to put their guns back into operation. Bottom line: firearms that do not go bang when their triggers are pulled are liabilities that should be repaired, discarded or relegated to wall-hanger status.
So what can the average shooter do to reduce the chances of unwelcome gun problems? We can start by taking a page from armorers and gunsmiths. Blaster mechanics have specific steps—usually referred to as Technical Inspections or TI—that are performed at routine intervals and aimed at heading potential problems off at the pass. While performing a proper TI requires specialized tooling and knowledge that are beyond the scope of this article, a few critical components can still be checked and serviced with basic tools and rudimentary skills. Each firearm type and model has its own series of steps and tricks so I’ll focus on the AR platform here due to its wide-ranging uses and overall popularity.
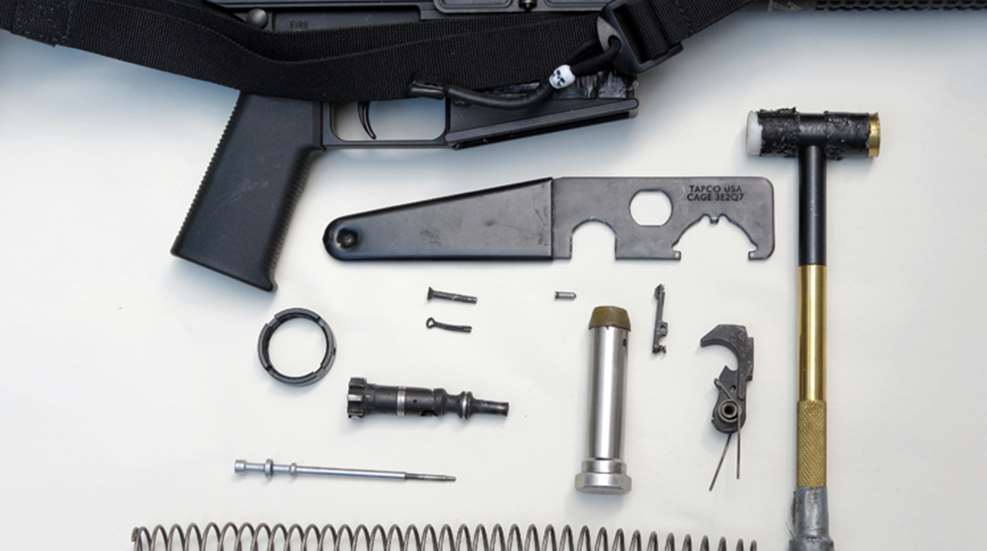
Over the course of your AR’s life, several easy-to-change components will likely need to be replaced. There is no set round count for any of these items—at least not one that’s accurate. Rather you have to inspect each part (or its corresponding function) to see if it’s still serviceable. The following checklist covers some basic AR parts, moving from stock to muzzle:
- Action Spring: Also known as the buffer spring or recoil spring, action springs lose their ability to keep up with the normal action cycling over time. Large and small AR receiver guns have different lengths for their fixed and collapsible stocks’ recoil systems so there are at least four general sizes. It’s important to get the right spring size for your gun type. If your AR is otherwise clean and working but gets sluggish to the point where the bolt carrier is visibly and audibly slow or cannot fully feed a round into the chamber, it’s probably time to change the recoil spring. There may be other problems present, but a new spring costs just a few dollars and is a good starting point. Likewise if during maintenance, you see that the recoil spring is kinked, severely bent, corroded or visibly shorter than a new one of the same type, replace it.
- Buffer tip: That little, wedge-shaped synthetic tip on at the rear of your AR’s recoil buffer should last many thousands of rounds. However its life can be shortened by anything that increases the force or frequency with which it impacts the rear of the receiver extension (aka buffer tube). When new, the tip’s outer diameter is nearly the same as the aluminum buffer body. Once it mushrooms out, the amount of dampening it provides is reduced, affecting component wear, bolt carrier speed and overall system timing. The tip shortens as it mushrooms out too, which can allow the carrier on .308-sized ARs to go too far rearward, impacting the front of the receiver extension, the lower receiver, or both. Replacing the buffer tip is not particularly difficult. You simply drive out the roll pin, pull out the old tip, insert a new one, align the pin holes and reinstall the roll pin. The problem comes in finding standard replacement tips. Fortunately a new stock rifle or carbine buffer can be had for $10 to $15 so simply replacing the buffer is not too painful. Aftermarket buffer tips made of proprietary materials are available from Buffer Technologies and Blackjack Buffers for about the same cost and offer somewhat dampened recoil impulses over stock buffer tips.
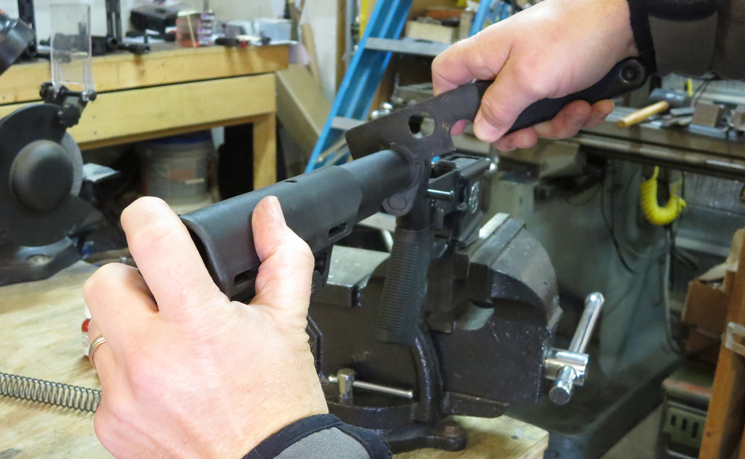
- Castle Nut: The crenulated jam nut that holds a collapsible stocked AR’s buffer tube in place does not typically wear out or come off the gun unintentionally. But they do loosen over time if not properly installed. While a pair of channel locks or large pliers will work in a pinch, a stock wrench and a little Locktite 242 (blue) are the best medicine to keep it tight. Staking the castle nut provides even more insurance that it won’t loosen again over time.
- Trigger Assembly: Trigger groups are a snap to replace, which is part of the reason why replacing factory triggers is preferred over trying to tune them. Unfortunately some of the competition trigger units have hammer springs that are lighter—and weaker—than MilSpec hammer springs. This poses no problem until your AR starts to “light strike” primers. The simple fix is a new hammer spring—either of the same weight and type or a heavier, stock spring. Be sure you pay attention to how the spring is placed and wound around the hammer. Every so often someone brings a gun to me with a trigger that doesn’t feel right and I find that the hammer spring was placed backwards on the hammer, severely reducing its falling momentum.
- Selector detent: The small, nail-shaped pin that helps your selector (safety) stay in the desired position should have a cone-shaped, distinctly-pointed tip. Over the course of thousands of cycles from “safe” to “fire” and back to “safe” this tip will round off or even gall a bit, making the selector more difficult to rotate. Replacing it requires removal of the pistol grip screw, grip and selector detent spring. Years of accumulated oil and gunk will cause the selector detent pin to stick in the selector drum’s groove. Wiggling the selector while lightly tapping the bottom edge of the receiver on a wooden bench helps it drop free. Remove the selector too for a good cleaning. In many cases you can cock and hold the hammer all the way down with one hand while removing the selector with the other once the detent is out. Trigger designs that don’t allow this will require removal of the hammer (or entire assembly if one unit) in order to free up the selector for maintenance. If that’s a bridge too far for your skillset, a pipe cleaner with some cleaning solvent can be inserted up through the detent pin hole to clean the selector from the inside. Prior to installing the new detent pin, put a drop of oil or grease on the tip to help it move in the selector’s detent slot.
- Firing pin: Aside from the rare broken tip, firing pins tend to last a very long time. AR-smiths use a small gauge to check the tip’s length but a simple visual inspection will also tell you about the pin’s condition. High pressure situations that cause the firing pin to regularly pierce primers will cause the tip to become jagged from erosion, leading to more problems with other primers. Examine your firing pin’s tip under magnification and if you see it’s flattened, pocked or burred, simply replace it with a new one. This is another cheap fix that runs south of $10.
- Firing Pin Retaining Pin: The FPRP should be swapped if either leg of the pin is broken. A heavily bent pin, which is an indicator or high pressure due to the firing pin slamming into the FPRP, should also be replaced. Pins can be bent straight in the field for a quick fix but eventually they shear and can potentially lock up their bolt carriers in a bad way. You should also seek to identify and remedy the high pressure issue that caused the bend in the first place.
- Extractor: If you can only pick one spare part to have on-hand, it should be an extractor assembly. That usually means a new extractor and spring/buffer but I’d throw an extractor pin in there too because they’re easy to lose in the field. The extractor takes a lot of abuse, especially when using hot loads, during high round-count firing and when using steel-cased ammo. It doesn’t have to break to be worthless. A burr in the extractor groove or the wearing off of even small amount of the groove’s front lip can prevent it from chambering a round, extracting a spent casing or may even retard ejection. The spring itself will lose some of its tensioning ability over time too. If your extractor is good but the spring and rubber buffer are bad, simply replace the old spring and buffer. Keeping a spare extractor assembly [in a small Ziploc] in your pistol grip is good insurance. A needle file can be used to carefully remove any burrs that develop in the groove.
- Gas rings: Like the rings on an internal combustion engine’s piston, AR bolt gas rings take lots of abuse from high pressure, friction and heat. Once worn past a certain point, they no longer hold back enough gas to allow proper cycling of the bolt carrier assembly. A rule of thumb for checking gas rings is to pull the bolt fully forward in the carrier (with firing pin, cam and retaining pin installed), then set the carrier on a table, bolt face down. The weight of the carrier will bear downward and if it collapses over the bolt, the rings should be replaced soon. They will usually continue to work quite a while longer but this test will let you know if the rings are on their last legs. A jeweler’s flat screwdriver or dental pic will make quick work of gas ring removal and installation. A spare set of gas rings only runs a few dollars. Remember to offset the ring gaps when installing them or during routine maintenance.
- Cam-Pin: Over time the cam pin gets worn by the constant force applied on it by the bolt carrier’s cam slot. You will notice what appears to be a ledge all the way around the cam-pin after just a few rounds but this is normal and does not hurt anything. If it gets to the point where the portion of the cam-pin below the groove is noticeably smaller in diameter than the portion above the pin or if the ledge becomes pronounced enough to affect the cam’s smooth movement in the carrier cam slot, exchange the old cam for a new one. Likewise if you see any hairline fractures around the firing pin hole in the cam.
- Bolt Body: The two main areas where a bolt fails are broken locking lugs or a cracked or broken bolt body at the cam hole. On suspect bolts I use specialized chemicals designed to check for subsurface cracks through non-destructive testing (NDT). You can often catch problems developing by periodically inspecting your locking lugs and bolt bodies under high magnification and good light. Any crack or breakage is cause to replace the bolt immediately. Do not continue to use it.
- Gas Tube Roll Pin: I don’t often see these little pins work themselves out on ARs but it does happen—and usually at inopportune times. Check to ensure yours is not drifting out over time and keep on hand either a spare or at least a piece of stiff wire or tiny hex key that can be inserted through the block and gas tube holes, and then bent around the gas block in a pinch.
- Gas Block Screws: Gas blocks secured with set screws can be as trouble free as dovetail pinned gas blocks, so long as the screws were installed and secured correctly. That means degreasing, thread-locking and tightening them all the way down. A spare screw of the correct thread and pitch is a tiny but useful addition to your field parts kit. Same goes if your gas block is adjustable by way of a screw. One time, after a three-hour drive to reach a 1000 yard test range, my adjustable gas block’s regulating screw backed out and rocketed into oblivion within the first 25 rounds of firing. Luckily I had a spare scope mount ring screw that happened to fit the gas block, saving me a wasted range trip that I would have had to repeat.

These components are far from the only things that require periodic checking on ARs and similar-type firearms. But they’re the easiest ones to deal with using a minimum of tools and effort. Most importantly, any one of them can make the difference between a good and bad day behind the trigger.