** When you buy products through the links on our site, we may earn a commission that supports NRA's mission to protect, preserve and defend the Second Amendment. **
The necessary parts and tools are listed below:
Parts
Hammer & Trigger Pins (2)
Hammer Hammer Spring (the larger of the two similar springs in the kit)
Disconnector
Trigger
Trigger Spring (the smaller of the two similar springs)
Disconnector Spring (this is similar to the bolt-catch spring, but it is identifiable because one end is wider than the other)
Tools
Small, non-marring Hammer
5/32 pin punch (Optional)
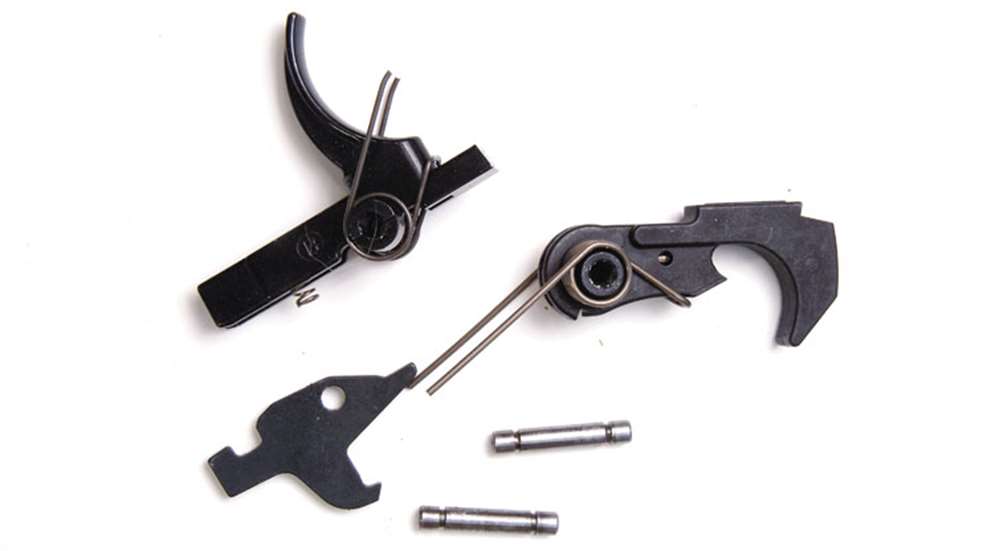
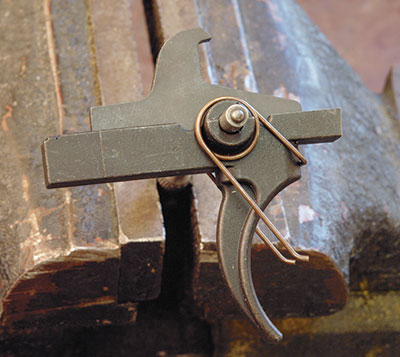 Install the trigger spring on the trigger. The top square loop will hook under the front of the trigger and the legs will point forward with the bent tips pointing up. They will push on the bottom of the receiver when the trigger is in place. Install the disconnector spring in the hole at the top-rear of the trigger. The larger end goes in the trigger. Push it in until it locks in place. The disconnector goes into the trigger and a single pin will hold both in place.
Insert the trigger assembly into the receiver and align the hole with the back one of the two pin holes in the receiver. You will have to push on the trigger and/or disconnector assembly to compress the springs and help align the holes for the trigger pin. It helps to use a straight-sided 5/32 pin punch as a slave pin to keep everything in alignment before installing the trigger pin. (Of course, doing so will drive out the slave pin.) The trigger pin has two grooves in it, but it doesn’t matter which way it is inserted. The accepted method is to push it left to right, with the groove on the left side.
 Next, install the hammer spring on the hammer. The legs of the spring should point down; the square, looped portion of the spring will be on the rear side of the hammer. Install the hammer in the receiver with the spring feet pointing back and resting on the trigger pin. When compressed, the legs will point to the back of the gun and one leg will fit in the groove on the trigger pin. Use a slave pin punch to align the hammer as you compress the spring. Then install the hammer pin, pushing the slave pin in the process. (You may have to temporarily remove the pin when you install the safety/selector, but more on that in a minute.)
 Function Check
Cock the hammer. Pull the trigger and make sure it releases the hammer. (Do not let the hammer hit the receiver in the process.)
Keep holding the trigger back. Push the hammer back and the disconnector should catch and hold the hammer. Releasing the trigger should cause the disconnector to release the hammer, which should then catch on the trigger sear in the cocked position. Repeat this test several times to ensure the trigger, hammer and disconnector are all working properly.
Unparsimonious Potential Upgrade
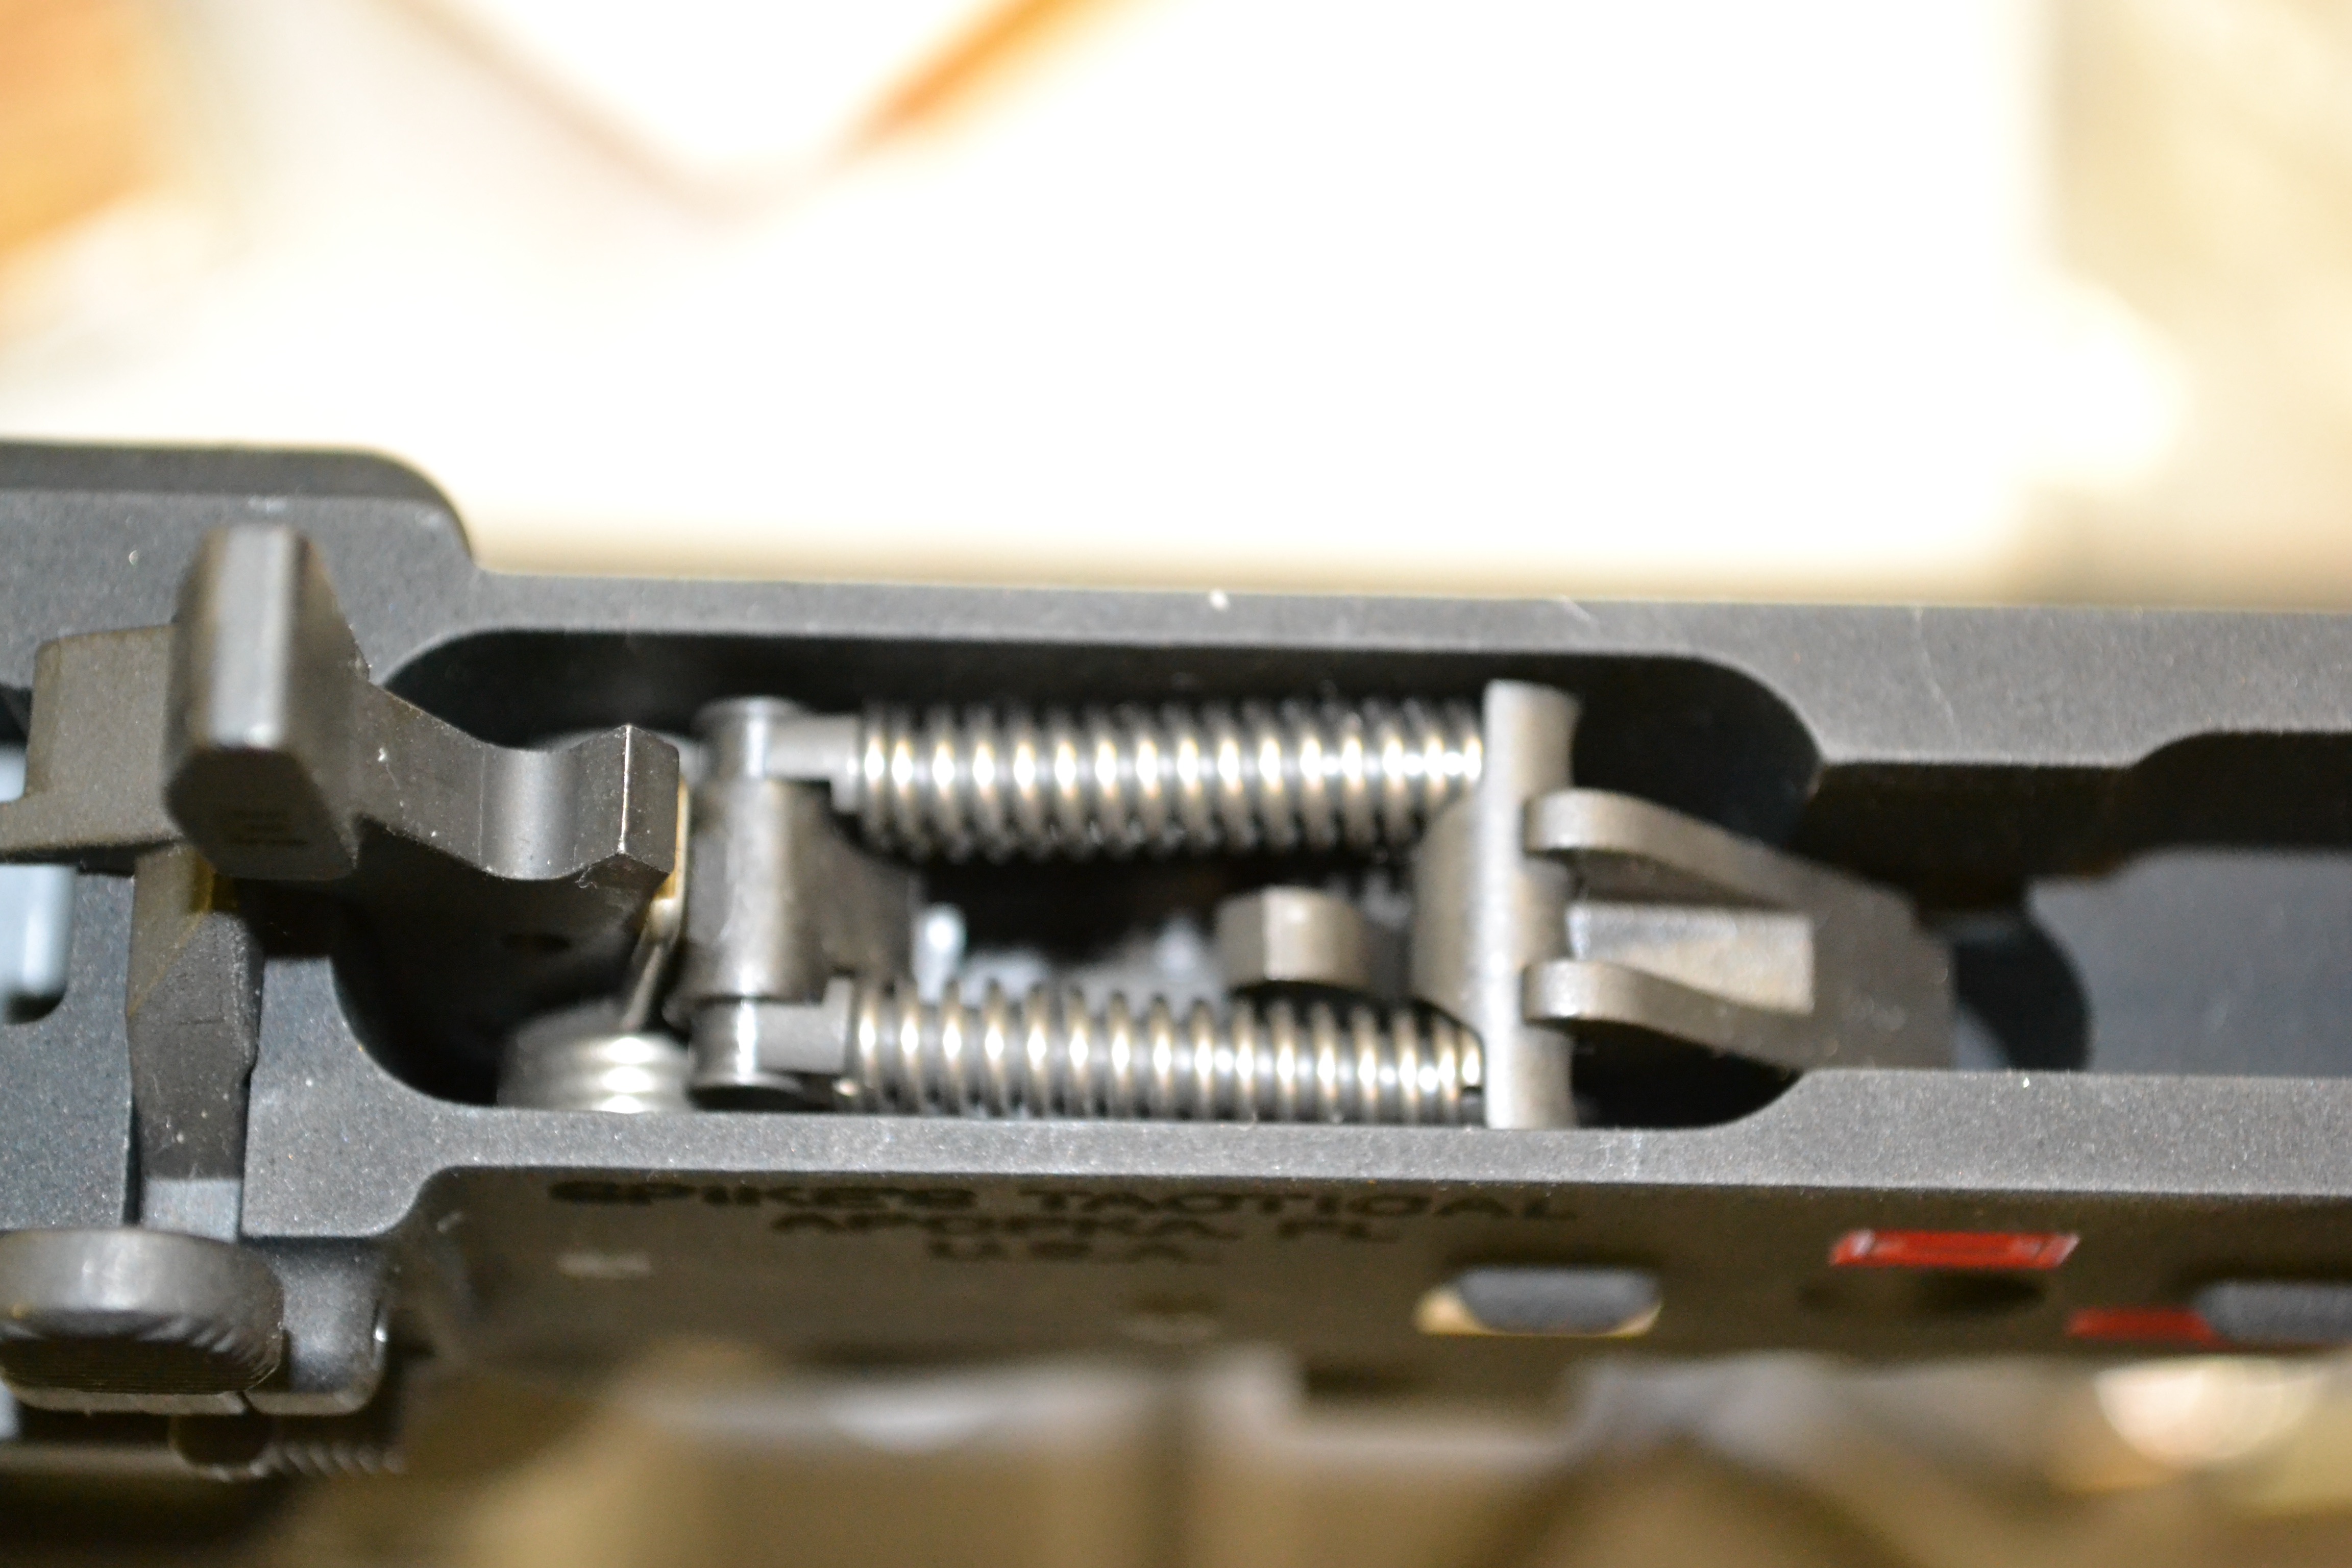
Alas, traditional mil-spec AR triggers aren’t known for being crisp, clean-breaking or for anything resembling precision accuracy. Fortunately, there are a handful of manufacturers out there, like Geissele , Jard, Performance Firearms, Timney an Wilson Combat that offer aftermarket alternatives sporting modern refined designs, including user-adjustable pull weights and one-piece modular construction to facilitate easier installation. I selected a Performance Fireamrs Hipertouch 24 Trigger for my build due to its dual overtravel toggle springs that successfully offset the high-sear-impingement force commonly found in traditional offerings.
 The end result is an adjustable pull weight between 2.5 to 4.5 pounds. Despite being more expensive than traditional AR triggers, the upgrade is well worth it due to the enhanced accuracy it will foster.
For those looking for a more economical alternative, JP Enterprises offers a reduced-power spring kit for target, hunting or competition ARs that replaces factory trigger springs. While they will not eliminate the gritty stock-trigger feel, they will significantly reduce creep and pull weight on a rifle’s trigger. But, be aware, they springs do wear out faster than normal and as such the company doesn’t recommend using them for defensive rifles.
The next entry will cover installing the grip and the Fire Control Selector, otherwise known as the safety.
Parts
Hammer & Trigger Pins (2)
Hammer Hammer Spring (the larger of the two similar springs in the kit)
Disconnector
Trigger
Trigger Spring (the smaller of the two similar springs)
Disconnector Spring (this is similar to the bolt-catch spring, but it is identifiable because one end is wider than the other)
Tools
Small, non-marring Hammer
5/32 pin punch (Optional)
A closeup showing proper trigger-spring placement. Note how the legs of the spring are oriented around the front of the trigger shoe and also how the spring loops under the front of the trigger tang.
Insert the trigger assembly into the receiver and align the hole with the back one of the two pin holes in the receiver. You will have to push on the trigger and/or disconnector assembly to compress the springs and help align the holes for the trigger pin. It helps to use a straight-sided 5/32 pin punch as a slave pin to keep everything in alignment before installing the trigger pin. (Of course, doing so will drive out the slave pin.) The trigger pin has two grooves in it, but it doesn’t matter which way it is inserted. The accepted method is to push it left to right, with the groove on the left side.
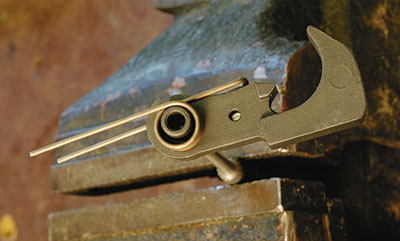
When installing the spring on the hammer, be sure that the loop in the spring is on the same side as the hammer face. This picture demonstrates the incorrect way. To rectify this, simply rotate the spring in place so that the loop ends up on the opposite side.
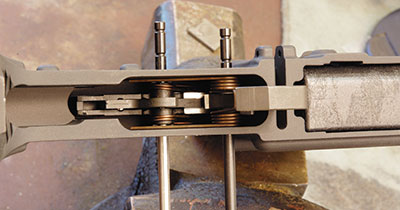
A bird's-eye view showing how two drift pins help hold the hammer and trigger components in the receiver. Once the holes are aligned, simply push the pins through.
Cock the hammer. Pull the trigger and make sure it releases the hammer. (Do not let the hammer hit the receiver in the process.)
Keep holding the trigger back. Push the hammer back and the disconnector should catch and hold the hammer. Releasing the trigger should cause the disconnector to release the hammer, which should then catch on the trigger sear in the cocked position. Repeat this test several times to ensure the trigger, hammer and disconnector are all working properly.
Unparsimonious Potential Upgrade
Alas, traditional mil-spec AR triggers aren’t known for being crisp, clean-breaking or for anything resembling precision accuracy. Fortunately, there are a handful of manufacturers out there, like Geissele , Jard, Performance Firearms, Timney an Wilson Combat that offer aftermarket alternatives sporting modern refined designs, including user-adjustable pull weights and one-piece modular construction to facilitate easier installation. I selected a Performance Fireamrs Hipertouch 24 Trigger for my build due to its dual overtravel toggle springs that successfully offset the high-sear-impingement force commonly found in traditional offerings.
In addition to sporting a proprietary disconnector parts, hammer and trigger, the Hippertouch 24 also features an impressive toggle-over-center Spring System that greatly reduces the impingement force on the trigger sear. The result is an adjustable, clean-breaking pull with a shoot and smooth amount of pre-travel.
For those looking for a more economical alternative, JP Enterprises offers a reduced-power spring kit for target, hunting or competition ARs that replaces factory trigger springs. While they will not eliminate the gritty stock-trigger feel, they will significantly reduce creep and pull weight on a rifle’s trigger. But, be aware, they springs do wear out faster than normal and as such the company doesn’t recommend using them for defensive rifles.
The next entry will cover installing the grip and the Fire Control Selector, otherwise known as the safety.