“I promised you fun,” I said.
“You don’t look like you are having any fun at all.”
It was the first time Paul Morris had tried long-range shooting, and he was having trouble with his rifle.
“Right now, you hate your rifle and you hate long-range shooting, right?”
He didn’t answer, but the look on his face told me I was right. We have all been there. There is only one cure.
“Here, come shoot my rifle. Try a head shot on that 500-yard steel target.”
The bullet hit dead center and Morris lit up like a kid on Christmas morning.
“Having fun now?”
“That’s the coolest thing I have ever done,” he replied.
Until that moment, he was mostly a handgun shooter. I fixed the loose scope mount on his gun, and he burned through $100 worth of ammo in the next couple of hours. Long range had another fan.
“I gotta buy a precision rifle like yours,” he said.
“This is one of a kind and you can’t buy one like it,” I replied. “But, it would be easy enough to build one.”
Here’s how:
When I conceived the rifle, I wanted to explore the concept of somebody who is reasonably handy with tools building a precision rifle on the kitchen table or in the basement. I wanted an economy “bolt-together” rifle, with the idea to customize it with select parts and gear while staying within a working-man’s budget. The other important thing is it must shoot well enough to earn the title Precision Rifle.
The Savage action was a no-brainer for this. It is the easiest to work with of any factory-produced rifle action currently on the market. The Savage Model 110 and its offspring are, or at least were, unique rifles. I believe they were the first production rifles to use a chambered and threaded barrel that screws into the action until the headspacing is correct. Then, a nut is used to lock the barrel in place. This makes the manufacturing process much simpler and is said to be a big factor in accuracy.
I acquired a Savage Tactical, Short Action, Magnum action from Savage with the bolt face for the 6.5 PRC cartridge. You can buy an action from Savage through its special-order department, from several online sellers or just buy a rifle and salvage the action. You can probably sell the barrel and maybe the stock that you take off to help offset the expense. Maybe you have a Savage rifle sitting around that’s not getting much use.
No matter the path, you need to end up with a Savage 110-style action, a barrel nut and a recoil lug. Actually, a precision-ground aftermarket recoil lug is a good idea. If it’s in your budget, I recommend buying one. You can get them at Brownells, E.R. Shaw’s or Holland Gunsmithing.
The barrel is the true heart of any precision rifle, with the highest-quality offerings selling for $1,000 or more. They will shoot, no doubt, but they violate the spirit of this project. I have been having very good luck with E.R. Shaw barrels lately. That company offers a 26-inch, fully machined and chambered bull barrel with a threaded muzzle for $395. I ordered mine in 6.5 PRC with a 1:8-inch twist rate.
Remember, the Savage action comes in two thread sizes. Small is for standard cartridges, large is for magnum cartridges. My choice of 6.5 PRC required I use a large-thread action.
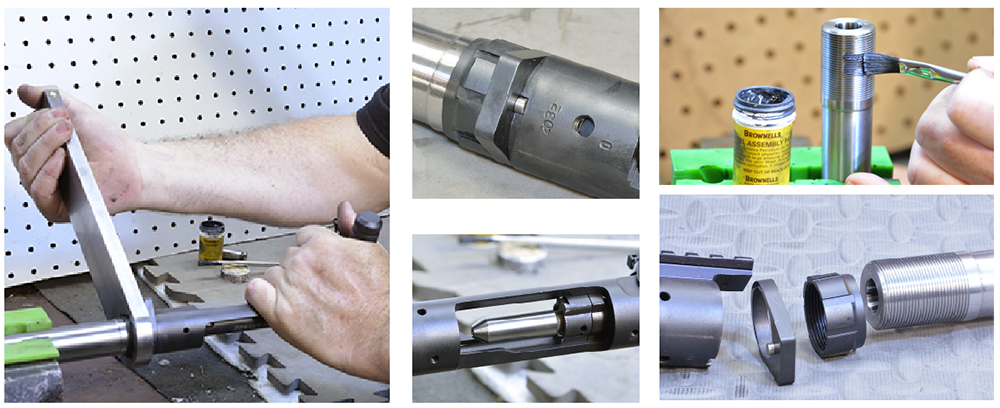
You will need a barrel-nut wrench like the one I got from Sharp Shooter Supply. This big wrench works for both the notched and smooth barrel nuts, and is an indispensable tool for this project.
Inexpensive soft jaws for your bench vise should be enough to hold the barrel while you work. I got mine online for about $10. If you don’t have them, try drilling a hole slightly smaller than the barrel diameter in a 4x4x2-inch block of hardwood (which these days might run you more than the cost of this rifle build. Kidding, but lumber isn’t cheap). Then cut the block in half through the center of the hole. Coat the half circles in the blocks with powdered rosin, (or friction tape) insert the barrel and clamp them tightly in a large, bench-mounted vise.
You may be able to hold the action by hand when tightening the barrel nut, but an action wrench is always better. Holland’s Action Wrench (hollandsgunsmithing.com) for the Remington 700 fits well in the Savage action. It will give you control over the action. If you control the action and the barrel as the nut is tightened, then the headspacing you selected is maintained.
You need headspacing gauges to make sure, though. Do not use a cartridge, ever. Even though you saw it on the internet, it is not a safe or appropriate way to adjust headspacing. Spring for a go gauge, or better yet, get the set of go and no-go. You can rent them, but it’s not much more money to buy a set. I got mine from Manson Precision Reamers, where Dave Manson makes the best stuff out there, and they happen to be reasonably priced.
Make sure everything is squeaky clean before you start; barrel threads, action threads, bolt face, headspace gauge and the chamber. Brush the threads and blow them clean with compressed air if you have it. Put a little grease on the threads to prevent galling.

Screw the barrel nut on the barrel as far as it will go. Then, slide the recoil lug on the barrel and install the barrel in the action, leaving the nut loose. Turn the barrel in until it contacts the closed bolt, then back it off a quarter inch. Make sure the recoil lug is correctly aligned. The recoil lug should have a protrusion that fits into a slot in the action. This maintains the correct orientation of the recoil lug when fitting the barrel.
The Manson headspace gauge has a notch in the base to allow for the ejector to fit though, so you can slip the rim under the extractor, align the notch with the ejector and close the bolt to set the headspace. It’s better to strip the bolt, but that takes more tools. This approach works fine and it’s how I set the headspace on this rifle.
Open the bolt, insert the headspacing go gauge as instructed and close the bolt. Screw the barrel into the receiver until it gently (emphasis on gently) contacts the go gauge and then tighten the barrel nut hand tight. Open the bolt and remove the gauge. Then tighten the nut very tight. The spec from Savage is 45 ft.-lbs. But, if you are lacking a torque wrench, tighten it until you are starting to strain on the wrench a little bit. (Unless you are built like The Rock; then some adjustment is required.) When doing the final barrel fit, it’s important to control both the barrel and the action as you tighten the barrel nut. They must not move.
Check to make sure the bolt will close with the go gauge in place. Do not force it. If it closes with difficulty, the barrel is too deep. Repeat the process.
This gives you minimal headspacing, which is usually a positive factor for achieving good accuracy. A no-go gauge can identify mistakes like not having the go gauge properly placed when you tightened the barrel or the barrel moving during the process. By ordering both you also have them for any future projects.
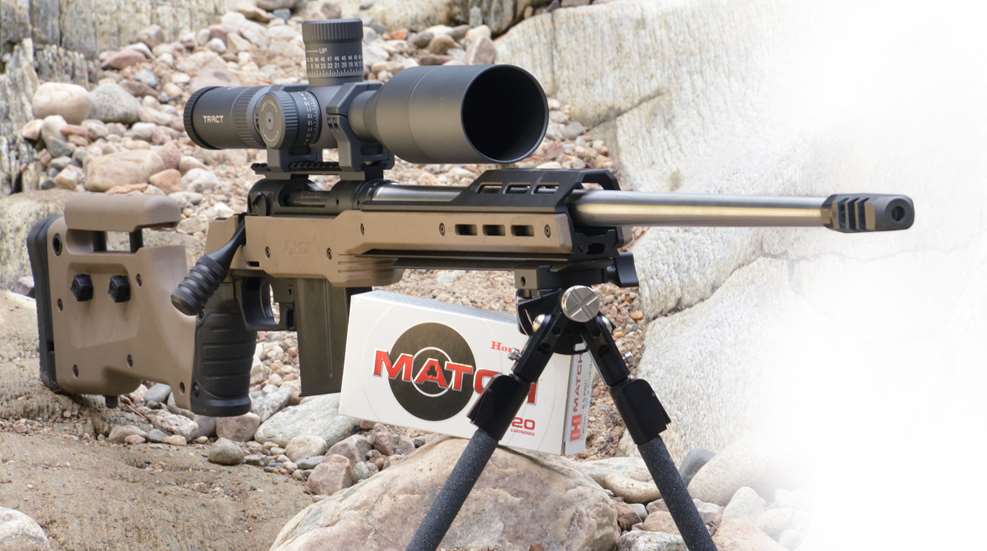
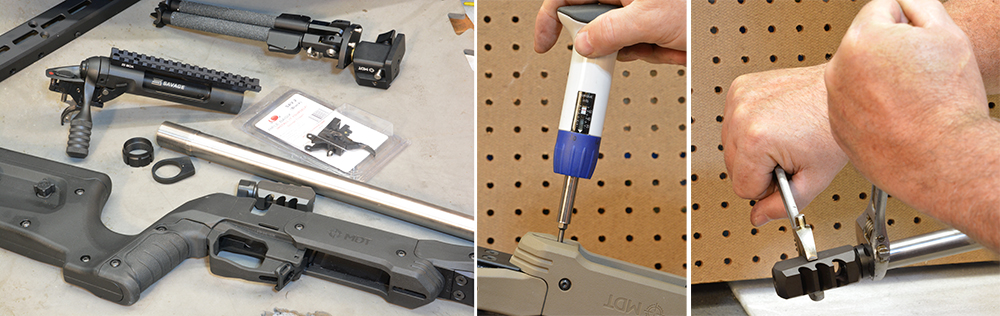
A chassis or stock will finish the gun. It’s pretty easy to drop $1,000 or much more on a chassis, unless you buy from MDT. This Canadian company has some excellent chassis and stocks for a wide range of firearms. They are well thought out and clearly designed by trigger-pullers.
MDT offers its XRS chassis system to fit a Savage short-action rifle. It’s a great setup and, best of all, it’s priced less than $500. The company will even offer its stocks on a payment plan. The chassis core is CNC-machined from 6061 aluminum. Length-of-pull and comb height are adjustable. It comes with the “bottom metal” for AICS magazines and it weighs 3.9 pounds. It’s really all you need. Just bolt it on and you’re done.
The trouble is that MDT offers so many accessories, I couldn’t resist. First off, it makes magazines to fit. You are going to need a magazine anyway, so why not? I added an enclosed fore-end and a fore-end weight. I want my rifle to be heavy so I can spot long-distance impacts. It is, checking in at 16.25 pounds unloaded. Recoil with a brake is like that of a .22 LR.
While I violated the concept of economy a little, I added an MDT SKYE-Pod bipod. I had about sworn off bipods until I started using this one. It’s well-engineered and extremely well made. It ain’t cheap, but it’s by far the best bipod I have used. Besides, it’s not just for this rifle. I can change the attachment style to use it on any of my long guns.
I ended up with a Shaw Titanium muzzle brake and an MDT muzzle brake. It’s good to have choices, and in this case it mattered. To install, hold the gun in a padded vise or the barrel clamp you made and make sure the gun is level, side to side. The scope-mount rail is the best place for the level. Then screw on the muzzle brake and level that to match the action as you tighten it into place. You can tweak it a bit later if needed, but I found a level brake works pretty well on a heavy, precision rifle.
The rifle shot best with the heavier MDT brake and, because it uses a nut to lock it in place, I was able to “tune” the harmonics a bit by moving it in and out a thread or two at a time until the gun started poking ragged holes with multiple bullets. I have plans for the lightweight Shaw brake on another rifle, anyway.
The AccuTrigger that came on the Savage action was outstanding, breaking at just 2 pounds. It would be fine for this build, but I can’t leave well enough alone, so I ordered a Rifle Basix replacement trigger. I think this is the only “box” trigger for the Savage on the market. It takes a little tweaking, but mine now breaks super clean at 1.5 pounds.
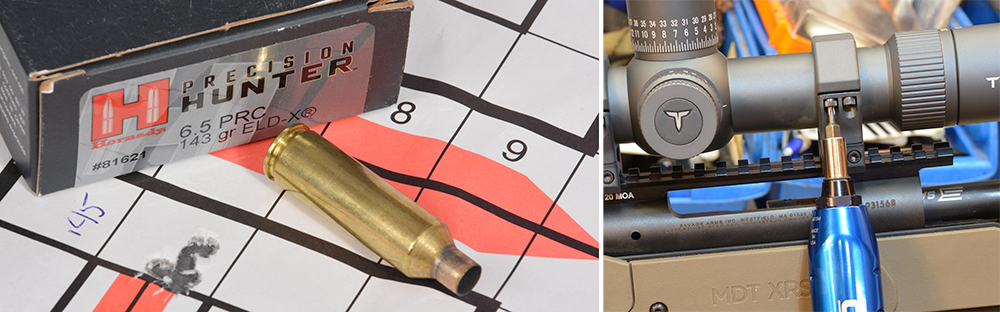
I fitted a 20-MOA rail on the gun using #242 Loctite on the threads. Then I installed a Tract Ultra HD Toric 4.5-30x56 mm riflescope with a 34 mm tube using IOTA Triad 34 mm rings, both purchased direct from Tract. These rings come with several key inserts, so you can match your rail exactly for an ultra-secure mounting system.
Tract is a direct-to-consumer optics company started by two former longtime employees of Nikon. Because it sells directly to the consumer and not through distributors or retail, the cost-to-quality ratio of their products is extremely appealing. This scope features Schott glass, great coatings and precision repeatability. It may well be the best long-range riflescope that you never heard of.
So, how did it shoot?
The average for five, five-shot groups at 100 yards using Hornady 143-grain EDL-X ammo—which exited at 3,022 fps—was .65 inch. The match ammo was just behind it at 2,986 fps and a .8-inch average. These results were from the rifle’s first time at the range, and it has continued to shoot better and better the more use it gets. It shoots great hot and to the same point-of-impact with a hot or cold barrel. I shot it out to 500 yards, which is as far as my range goes. When we arrived, I made a cold-bore, first-shot-fired, hit on a 4-inch disk at 500 yards. I am thinking that with tuned handloads it’s going to be a consistent sub half-MOA rifle.
Not bad for a budget-minded, kitchen-table build, don’t you think?