From its curvaceous slide and tapered contours near its muzzle to the sultry slope of its trigger face and extra-wide guard, in its OEM form the Browning Hi Power is as stunning to the eye as it is to the hand.
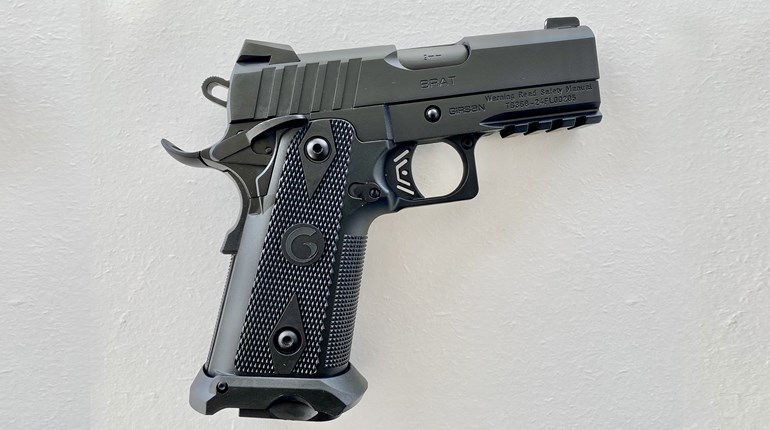
The Girsan MC P35 PI I chose for this project came with the curved OEM trigger, I had not originally intended to replace it, because I have been endeared to its iconic design for as long as I could remember and, other than possessing tad of creep and grittiness when pulled, it was just what I wanted. That is until I open the care package Mark Allen of BH Spring Solutions sent me for this project. Buried among the myriad of accessories, parts and tools—all or which is essential for Hi Power tinkerer—was one of the company’s alternatives to the standard Browning Hi Power “bang switch.” Out of curiosity, I opted to install the trigger in one of my MKIIIs, and it didn’t disappoint.
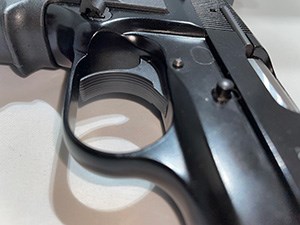 The company’s BH Advanced Trigger Sub-Assembly with Magazine-Eject Assist boasts a refined design that repositions the trigger “shoe” in the Hi Powers’ trigger guard, thereby fostering a more straight-back trigger pull and reset—much more characteristic of John Browning’s trigger designs. In addition, the face of the trigger is slightly wider than the OEM model. The extra real estate interfaces with more surface area of the trigger finger for a better-feeling trigger pull.
Other benefits include a redesigned-refined trigger lever/pawl geometry, which minimizes the metal-to-metal resistance of the pawl where it contacts the frame while optimizing the point where it contacts the sear lever. The trigger ships with an assortment of four trigger-return springs. The difference in the Trigger Return Springs is the diameter of the spring wire with each lesser diameter spring reducing scaled trigger-break weight by approximately half a pound. BH Spring Solutions points out that even their lightest trigger return spring typically provides excellent authoritative reset. Depending on which one is selected allows the user to tune the trigger pull, as easy as changing the trigger-return spring. In addition to eliminating the magazine disconnect, which many students of the Hi Power platform suspect is a contributing factor to the pistol’s mediocre trigger pull, this kit also resolves another design conflict (one found in all original design Hi Power triggers) between the trigger-return spring and the trigger pin.
One of the coolest features involves the addition of an optional Magazine-Eject-Assist-Spring. When installed and properly tuned, your magazines eject with the extra authority seen with the added tension associated with Browning Hi Power “mousetrap-style magazines.”
BH Spring Solutions posted a 1-hour trigger-installation video on YouTube that demonstrates each of these steps in a tutorial format, as well as great detail.
Though I will try to be as concise in conveying the instructions for accomplishing this task, I highly recommend watching the video completely—perhaps more than once—to familiarize yourself with the process before attempting any work with the trigger assembly.
The best way to approach this trigger installation is in respectively six phases: (For convenience, the timestamp references listed below correspond approximately to the referenced steps.)
- Cleaning (4:11-5:45) / Potential polishing (12:20-14:40 and 15:27-17:22)
- Potential tuning of the magazine-assist spring (17:30-25:18)
- Trigger assembly placement (25:19-27:19)
- Potential magazine-assist spring placement (1:01:43-1:04:45)
- Adjust trigger-pawl height (27:30-34:16 and 34:17-43:59 and 44:00-45:02)
- Magazine eject assist installation (1:00:16-1:07:40)
In an effort to present instructions in a more linear fashion, my instructions will appear in a different order.
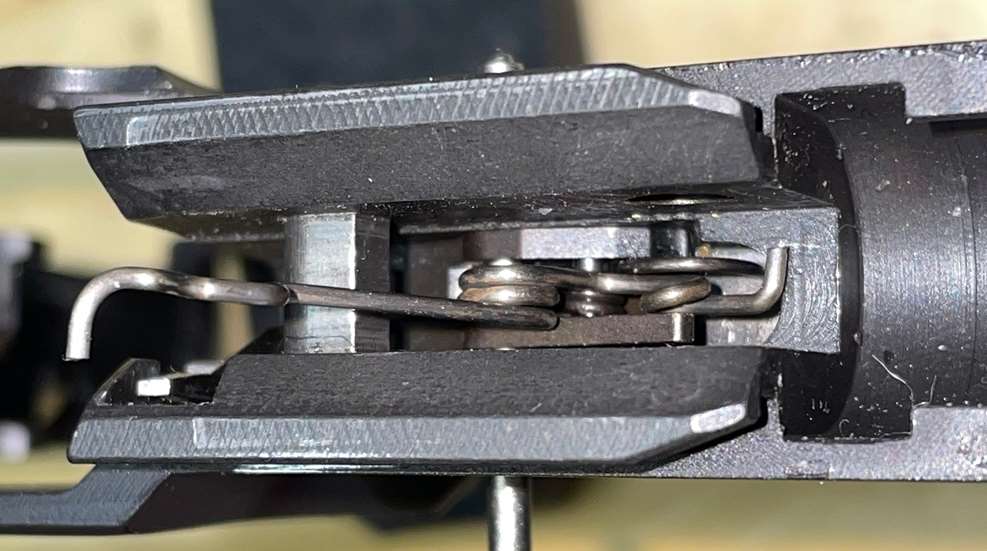
Begin by placing your mostly assembled frame (minus the trigger and trigger pin) on BHSS’ magnets or workbench in the vertical position and install the trigger pin in corresponding hole of the new trigger. Does it rotate freely? If not, polish the shaft of the pin until the trigger rotates freely on the pin.
Now, install the pawl onto the trigger while it’s out of the frame.. When oriented correctly, the portion of the pawl that interacts with the sear lever resides on the right side of the frame. The lower portion of the pawl which installs into the trigger is flat, and contains a small, round-shaped notch on its side. To properly install the pawl into the trigger, angle that notch into the hole located in the right inner portion of the trigger. Once hooked into place, the left potion of the pawl will drop down into place and allow the pawl to be rotated upward and locked into place. Once installed in the trigger, check its range-of-motion and verify it moves freely. When confirmed, rotate the pawl completely downward to remove it and set the pawl aside. (13:23-14:40) To see the trigger and trigger pawl’s relation to the trigger-return spring, pay particular attention to 14:39-15:20 in the video.
Next, install the trigger in the frame with the trigger pin, and check its movement. It needs to move freely. In the case of any binding, polish the trigger-well area and the area of the frame where the trigger pawl will reside.
With the test fitting and polishing complete, it’s time to install the trigger-return spring. But before you do, the amount of room in the frame’s trigger guard can vary greatly depending on the type of Hi Power you own, which can make installing the trigger a bit of a challenge. So, you may wish as this point to add a piece of packing tape to the bottom inside of your frame’s trigger guard. Doing so will prevent marring as you may have minimal space to “snake” the trigger up through the well and align it properly.
This trigger’s package contains four trigger-return springs from which to choose based on your desired pull weight. (Consult the literature in the packaging for guidance (8:46-10:00 in the video). In addition, the type of trigger-return spring you use will be partially determined by whether or not your pistol contains either a type I or type II sear level and its relation to the sear lever, for more information regarding that, consult the video at 45:39-54:46) Once determined, install the return spring onto the in the trigger using a bench block and the included trigger-return-spring pin. The pin is quite small, so you may need the assistance of either a starter-pin punch or needle-nose pliers. With the trigger-return spring in place, install the trigger again to see if you can snake it into place. Should it be necessary, a small amount of material can be removed from the back of the trigger-return spring, using either a pair of cutters or a Dremel to gain some extra clearance.
 Install the trigger, orient it in the correct position so that its large hole aligns with the corresponding holes in the frame and secure it from the left side with a 3/32 punch serving as a slave pin.
Now, you need to check the positive positioning of the trigger pawl and verify that it’s functioning properly. Do so by pulling the trigger completely to the rear, push the raised pawl toward the dustcover and let go of it. Spring tension should force it to slingshot to the rear and cause the trigger to return to its at-rest position. (44:13-44:56)
Next, if you want to install the Magazine-Assist Spring, you will need to temporarily install it, test it for clearance and adequate tension (and adjust it, if necessary). Position yourself and the frame so you’re looking straight down the mag well. When oriented correctly, the smallest hole in trigger will be pointed toward the front, on the right of the trigger-return spring, while the largest hole in the magazine-assist spring will align with the trigger-pin hole in the frame, which means, when properly positioned, that hole in the spring must be oriented and aligned with the corresponding holes in the frame and the trigger. When installed, the magazine-assist spring will become part of the trigger assembly and be held in place by the trigger pin. Once a magazine is seated in the pistol, the back (or tail) portion of the spring will curve around the left interior portion of the mag well where it should have contact with the front-left of the magazine housing. Pressure from seating a magazine in the pistol places tension on the spring, which isn’t relieved until the magazine release is actuated.
Orient the spring in the correct position so that tail portion of the Magazine-assist spring is on the left side of the mag well and that the spring’s large hole is straddling directly over where you can see where the punch/slave pin is passing through the center of the trigger, directly in line with the holes in the frame.
While I wouldn’t use either the words “easy” or “simple” to describe the next step, your next step is “simple” on a conceptual level. Center the spring’s hole over the slave pin, and once it’s in place use a second punch to apply downward pressure on it while slowly backing the slave pin that is holding the trigger in place—but don’t completely remove it from the frame. Go slowly, and as you slide the slave pin outward, the downward pressure from the second punch should guide the magazine-assist spring into place. You will feel it start moving into place. When you do, begin pushing the slave pin back into position. Once the magazine-assist spring is temporarily in place, you need to check its tension and whether or not it needs to be tuned.
Begin by inserting a magazine into the frame. Once in place, you’re checking for three things:
- First, the curved-tail of the magazine-assist spring must have sure contact with the top left-front edge of the magazine body.
- Second, the curved-tail portion of the magazine-assist spring must have little-to-no contact with the inner wall of the frame and/or magazine follower when the trigger is pulled.
- Third, does the magazine eject with enough tension when the magazine-release button is actuated? If not, carefully back out the slave pin again, allowing the trigger assembly to remain in place and adjust the spring accordingly using a pair of needle-nose pliers (Consult the enclosed instruction, but in essence downward pressure on the spring will increase tension while upward tension will lessen the tension.) Notice that with the magazine-assist spring in place once a magazine is inserted, there is no tension on the trigger, so the trigger is allowed to float freely, however, depressing the magazine release forces the magazine-assist spring to uncoil and it and the trigger-return spring take over.
With your magazine-assist spring tuned, rotate your frame on the magnet, so that the dustcover is facing you and you are still peering down onto the frame. Next, remove the magazine-assist spring and the slave pin. Rotate the trigger forward and down—as if you’re going to remove it—but as the front of the trigger enters the top of the trigger-well area, pull the trigger fully to the rear. Doing so will cause the back of the trigger to raise upward. Next, while keeping rearward pressure on the trigger, or you can cheat by wedging something the appropriate inner-diameter of the area between the trigger and trigger guard. (I used a paint spatula with a couple of rubber bands wrapped around the hand for some added resistance to hold it in place in order to free up my support hand.) Next—and regretfully this is going to be almost as challenging as removing the trigger pin, but if a gimpy gunwriter can do it so can you—now it’s time to insert the trigger pawl, which is, unfortunately, one of those things that is accomplished more by “feel” than by sight.
To add to the challenge, the back portion of the trigger-return spring will be in the way. So, in order to install the trigger pawl, you may need to lift up on the spring long enough to position the pawl in place and hook its small notch on its bottom-right side into the hole located in the right inner portion of the trigger. Once hooked into place, the left potion of the pawl will drop down into place and allow the trigger-return spring to be oriented over the lever, rotated upward and locked into place. If done correctly, it will be under tension by the rear leg of the trigger-return spring. (Unless your name is Mark Allen) you will more than likely need to utilize some sort of tool to lift the rear leg of the trigger-return spring in order to create sufficient clearance for the pawl/trigger lever to successfully slide beneath the spring and lock into the trigger. (I used a typewriter-repair tool that has a hook, similar to that found on the end of a crochet needle.) It turns out that this is not uncommon. A member on the staff at BH Spring Solutions confided in me that he uses a dental pick to accomplish the same dreaded task.
Once the trigger pawl is installed, re-orient the trigger so that the large holes in the trigger are centered with those of the frame. (Doing so may require using the same tool to coax the front of the trigger-return spring into the trigger well beforehand in order to get everything to align.) When everything is centered, reinsert your slave pin into the frame and trigger—from the same direction as before—to hold everything securely in place.
At this point, you need to check the trigger-pawl height. For FN Brownings, the correct height can be eye-balled for the correct height. Looking at the frame from the opposite side, the tip of the pawl should be just slightly above the top of the frame’s ridge—and not protrude above the frame rails—when the trigger is in the relaxed (not pulled) position.
If the height looks correct, attempt to install the slide on the frame. If it clears the frame without binding on the pawl, reinstall the slide onto the frame and replace the slide stop. However, if the pawl/trigger lever is too high, you’ll also be unable to reinstall the slide. (Similarly, there’s a chance the pawl will bind on the underside on the sear lever, making it impossible to completely cycle the slide. If that’s the case, the pawl/trigger lever is too tall. Remove the slave pin—and slightly drop the trigger assembly—in order to safely remove the slide without damaging the pawl.
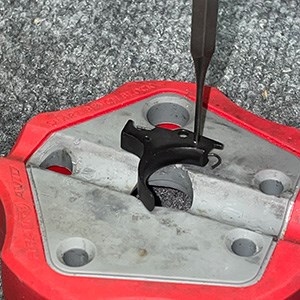
To make any necessary height adjustments to the pawl, you’ll needs a Dremel or Foredom tool along with either a Cratex bit or an abrasive drum. Orient your frame vertically with the butt of the grip against the BHSS magnets of your workbench. Position the frame so that the dustcover is facing you. Next, while grasping the grip with your support hand, pull the trigger so the pawl is raised up above the frame. While keeping the trigger pulled, use the grinder in your strong hand to gradually reduce the pawl’s height—go slow—the key is to take your time and gradually reduce the height (while maintaining the tip of the pawl’s existing contour). You must avoid making the tip into a point. Remove a little metal at a time and reinstall the slide and slide stop to then check your work.
Do so by cycling the slide and pull the trigger. Once the hammer falls, keep the trigger pulled. Now, cycle the slide again. The act of cycling the slide will move the trigger and trigger finger slightly forward. You should be able to feel the movement in your trigger finger and see the movement, though in reality the movement won’t be very noticeable. This height adjustment is finite and should be done carefully. A little goes a long way, and it can be overdone. (But don’t worry, if you remove too much metal BHSS sells replacement pawls.)
This adjustment contributes to the trigger’s amount reset, so stop once you’re happy with the amount. (A degree of reset is required, especially if your pistol contains a type II sear lever.)
Next, you want to check the trigger lever and its relationship to your barrel. Do so by removing the slide and place the barrel in the frame as it would be when the pistol is assembled. Now, pull the trigger and hold it back while keeping the barrel in place.
What you’re examining is the portion of the raised pawl and how it interacts with the right portion of the barrel’s face. When the trigger is pulled, the top of the pawl should not encroach into the right-bottom edge of the barrel’s circumference (If it does, reduce the height just a tad more.) In addition, when the trigger is pulled, and the pawl is raised the left portion of the pawl should not encroach into the barrel’s chamber area. (If it does, grind a slight bevel to the area of the pawl that is encroaching with the chamber. Upon completion, the pawl is now fitted.
All that is left is the final installation of the tuned magazine-eject-assist spring. (When doing so, you can replace the slave pin with the trigger pin and tap that firmly into place.) Finally, place the barrel and reoil-spring assembly back into the slide and reassemble your pistol.
Perform a function and safety check and, if every assuming everything checks out, you have successfully installed the BHAdvanced Trigger Sub-Assembly with Magazine-Eject Assist.
The next, and final, installment will cover pitfalls encountered during this project, how the customization improved its performance regarding specs—both previous and current— and, most importantly, how the pistol with a new lease on life performed on the range.