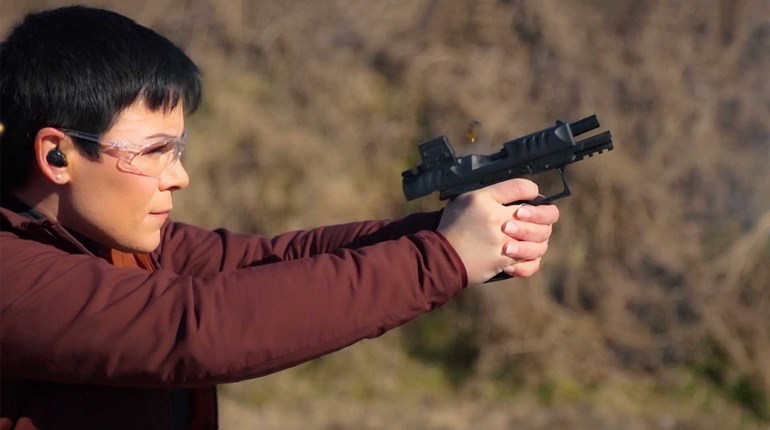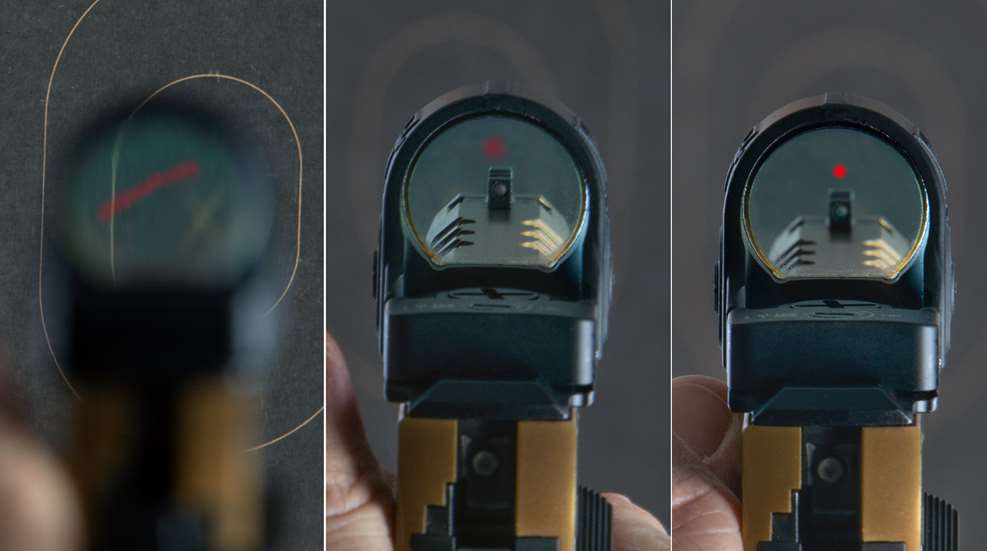
Just as different defensive scenarios will require different trigger presses, the amount of detail present in your red-dot optic will change depending on the time constraint and distance to the target.
“Demand more of your dot stability. Demand more of your trigger control. Know the relationship between the two.” —Max Michel, IPSC World Champion shooter.
Trainers stress the benefits of a sound visual process and efficient fire-control process, but few expound on the pairing of the two.
World-champion shooter Max Michel articulates the importance of pairing the most effective trigger control for each of the three red-dot sight pictures—flash, float and focus as you are reading it. The core concept here is to most efficiently match your trigger press with the recognition of your visual read, then get off that trigger and back on it again (as part of this same shot) in preparation for your next.
As per Michel, the three trigger manipulations are as follows: for a flash, slap all the way through (speed); for a float, apply more precision, but still all the way through (carefully) and for a focus, pause, prep, press. The purpose of this particular drill is to first gain familiarity—and eventually proficiency—with understanding and experiencing the relationship between dot stability and fire control.
Our drill this month trains you to match the most efficient trigger press with the three most common carry-optic dot reads:
Flash: Slap the trigger all the way through (rapid).
Float: More precise (careful), but still all the way through.
Focus: Pause, prep, press (precision all as one fluid motion).
Here’s the Drill
Set up three targets with a designated center mass: one at the 7-yard line (T1), one at the 15-yard line (T2) and one at the 25-yard line (T3). Shooters seeking more of a challenge may increase target difficulty by either reducing target size, increasing distance or setting a greater penalty for a miss.
Flash Read
Start with either a holstered pistol, hands below your gun belt or drawn to the low-ready position. On the buzzer or “go” signal, rapidly align your muzzle with the visual center of T1. As your dot moves into position, slap the trigger all the way through (yeah, just whack it) for the flash read. For all three drill segments, shoot at a pace where you can hit the designated center of the target. Run this drill at least three more times to develop greater familiarity and less processing time.
Float Read
Start with either a holstered pistol, hands below your gun belt or drawn to the low-ready position. On the buzzer or “go” signal, rapidly align your muzzle with the visual center of T2. As your dot moves into position, apply a more precise (careful) press, but still press all the way through for the float read. For all three drill segments, shoot at a pace where you can hit the designated center of the target. Run this drill at least three more times to develop greater familiarity and less processing time.
Focus Read
Start with either a holstered pistol, hands below your gun belt, or drawn to the low-ready position. On the buzzer or “go” signal, rapidly align your muzzle with the visual center of T3. As your dot moves into position, apply the pause, prep, press (all as one fluid motion) for the focus read. For all three drill segments, shoot at a pace where you can hit the designated center of the target. Run this drill at least three more times to develop greater familiarity and less processing time.
The purpose of this drill is to gain familiarity and further skill in appropriately pairing your various dot reads with the corresponding trigger presses needed to make your hits at those three distances. You will discover what it takes (timing and flow) to match your visual process with your trigger control.
Knowing what trigger press is paired with what read will help chip away at those pesky tenths of a second once needlessly spent on sequential processing (visual confirmation then press) as opposed to simultaneous processing (visual confirmation and press).