Rifle-modification options used to be limited to accepting your rifle as-is, paying a gunsmith to work their magic or carefully tinkering with a gun that could hardly be considered modular. Thankfully, we have come far enough out of those dark ages that many upgrades are within reach if you have the right tools, a little time and a willingness to follow instructions.
Unfortunately—and in spite of the many how-to sources for firearm mods—DIY-ers still get into trouble from time to time. Improperly attached muzzle devices— especially those which double as suppressor mounts—are more common than they should be and may lead to a damaged firearm, sound suppressor and shooter. A few simple guidelines can help you avoid these outcomes.
Before any tools come near your rifle, consult the manufacturer’s specifications and owner’s manual, and then closely examine the muzzle device that is currently in place. Ensure that it is not blind pinned and welded over, or seam welded to the barrel. Either method may be used to permanently affix a muzzle device to comply with various state and federal laws, such as the National Firearms Act (NFA) of 1934.
If your actual barrel length is less than 16 inches or your state mandates permanent muzzle-device attachment, removing it on your own can result in a lifetime forfeiture of your Second Amendment rights. Even if it can be legally removed, attempting to do the job yourself is likely to leave you with ruined barrel threads. Let a gunsmith do that work and if you are dealing with a potential NFA-compliance issue, find a Class II SOT licensee (manufacturer of NFA firearms) who can advise you of options and perform any necessary work legally. A good pin-and-weld job can be hard to spot, so get an experienced eye to check it over if you are not sure what you are looking at.
After successfully jumping through that hoop, identify the correct wrench size needed. Some manufacturers offer tools that are designed for their devices, but most common flash hiders and brakes have wrench flats. The two most-common sizes are ¾ inch and 7/8 inch, which can be found on many armorer wrenches. If a thread-locking compound has been used, a few seconds of heat-gun application will help loosen that bond. A very talented custom barrel maker on whom I lean for both general advice and premium barrels uses a combination of Kroil [oil] and heat to loosen devices that come into his shop. He also reserves the use of his muzzle-device wrenches for that purpose only, which makes good sense. If your wrench has been used for car repairs, as a pry-bar or to pound in the odd tent stake, any resulting marring of the jaws will be transferred to your muzzle device. I pad the jaws of my wrenches with a pair of fingers cut off of a latex glove as cosmetic insurance.
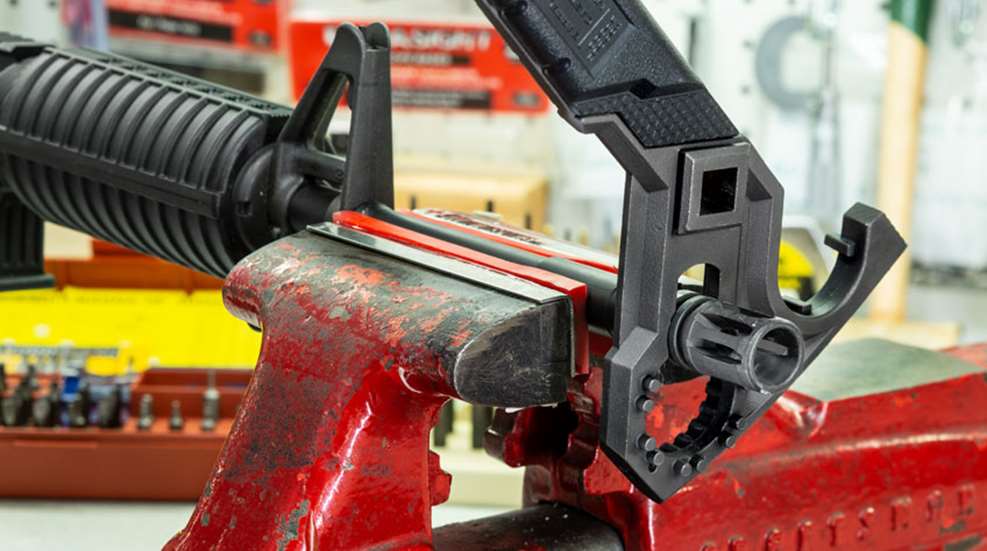
Prior to applying torque to a muzzle, the barrel should be secured in a suitably padded vise. Whether you are working on an MSR, bolt gun, lever-action or single-shot rifle, simply clamping the receiver in a padded vise or receiver block can twist or warp the receiver, shear a barrel’s index pin or damage a receiver’s index-pin slot.
Chamber-support tools have worked very well for me on both small and large AR platforms. I keep the lugged end of these inserts clean and burr-free, securing them in a vise. Small-AR-receiver owners have options from companies like Brownells, Geissele Automatics, Magpul and Midwest Industries. Geissele also offers its Reaction Rod in a large-AR-receiver size. My barrel expert notes that he has seen barrels rotate within their extensions due to excessive torque applied when using one of these fixtures. That results in a misaligned gas port and a change to headspace, both of which are big problems. For this reason, you should always follow a manufacturer’s torque recommendations and stay on the low end of those ranges. While several companies offer similar tools for bolt actions, I am told that they fit too loosely in the raceways to use for torquing a muzzle device. The preferred option is to mount the barrel in a vise, using padded barrel blocks to both hold it securely and prevent damage to the finish.
After detaching the muzzle device, you should also remove any crush washers or shims that were used to time or tighten it. Clean the threads with a stiff wire brush to ensure carbon buildup and residual threadlocker are removed. If you have the correct die, you can use it to “chase” the threads, cleaning up rough spots. Likewise, the correct tap will help to ensure the new muzzle device’s threads have no thread-eating burrs. Finally, degrease the threads of both the flash hider/brake and barrel with mineral spirits or a similar cleaner before proceeding any further.
While you wait for the degreaser to evaporate, closely inspect your muzzle with a bright light and some magnification. Check for any crown damage that might negatively affect accuracy or other issues that need attention—like a small mountain of baked-on carbon—and fix those issues before proceeding.
The same tools used to remove muzzle devices and support barrels are needed for installation. Unless you plan to remove your muzzle device routinely—such as when using a direct-thread suppressor—a good thread-locking compound that can withstand high heat, such as Loctite 271 or Rocksett, should be used. The manufacturer’s recommendations for torque are particularly important for suppressor QD mounts. Shim kits are typically provided with muzzle devices that require timing in a specific position, allowing you to err toward the low end of the torque range to prevent warping of the threads and muzzle.
Never use a crush washer to secure a QD suppressor mount. This spring-steel spacer is designed to apply pressure on a muzzle device to help it remain tight. Dimensional variations between each of the involved parts are large enough that a sound suppressor can come out of alignment with the barrel’s bore when a crush washer is used, especially as the different metals heat up. Once this happens, sending rounds through parts of your suppressor becomes a real possibility. Suppressor alignment should be checked after installing a QD mount, whenever possible. I use a Suppressor Alignment Gauge from Geissele on my .22- and .30 caliber bores. These precision-ground and polished, stainless-steel rods help spot potential baffle strikes due to misalignment before you head to the range. If you plan to use a direct-thread suppressor some of the time, a knurled thread protector will keep your barrel threads in good shape when shooting unsuppressed. Mild thread-locking compounds like Vibra-TITE VC-3 will help to hold a thread-protector hand tight, but still allow you to remove it when needed.
Muzzle-device removals and installations are not overly complicated tasks. But, if you do not feel you can do the job safely or without damaging your rifle, let a gunsmith do the work for you.