The next step in our AR-platform upper-receiver build is the assembly and installation of the to assemble/d install the bolt-carrier group and charging handle. The necessary parts and tools are listed below:
Parts
Bolt carrier
Bolt assembly
Bolt-cam pin
Firing pin
Firing-pin retaining pin
Charging handle
Charging-handle latch
Charging-handle spring
Charging-handle latch pin
Tools
1/16-inch roll-pin punch
1/16-inch roll-pin holder punch
Brass or plastic hammer Brownells bench block
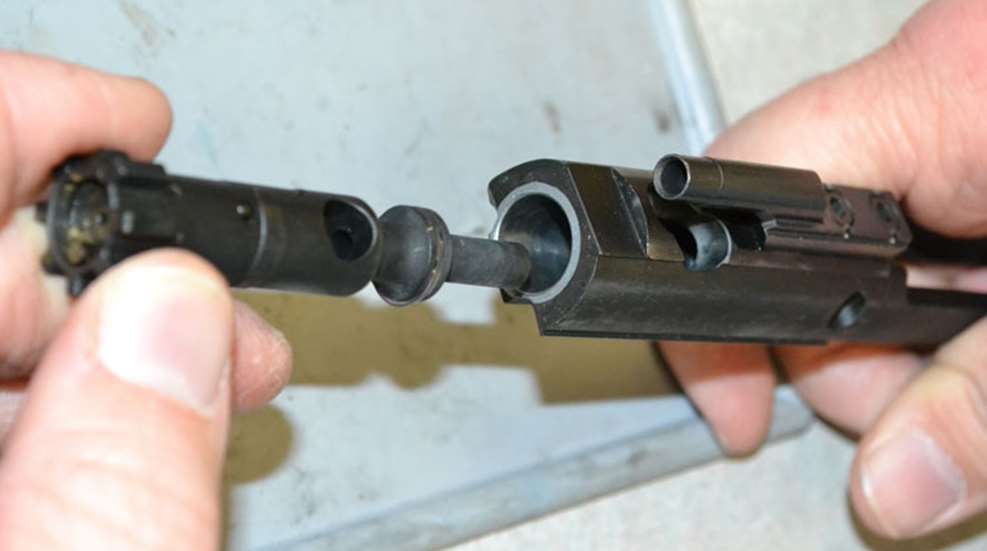
 Push the bolt into the bolt carrier from the front, making sure the extractor is oriented to the right side. (A 6.5 Grendel bolt was included with my Brownells barrel.) Drop the bolt cam pin through the hole in the bolt carrier and rotate it a quarter turn. Slide the firing pin into the bolt from the rear. Insert the firing-pin retaining pin through the bolt carrier. Make sure the head of the pin matches with the large recess on the left side of bolt carrier, so that it is below flush when installed.
Prior to doing do, I made a point to disassemble the bolt and add an MGI D-Fender D-Ring beneath the extractor to create greater tension for improved reliability. (The bolt was shipped with gas rings already installed.)
 Function Check
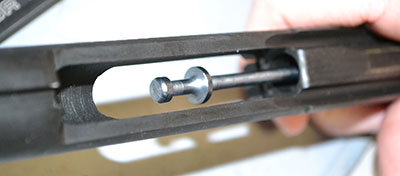
Install the charging handle by placing it in its slot in the receiver. Pull the bolt forward in the carrier, and place the carrier into the receiver so that its gas key rides in the trough on the underside of the charging handle. Make sure the carrier and the charging handle can move in the receiver without any problems. Then take both parts out and set them aside.
Optics sometimes make it hard to reach the charging handle. Since my rifle is destined for hunting, an optic is a definite. Unfortunately, most magnified optics feature large ocular lenses that can get in the way of accessing the charging handle. Fortunately, swapping out the standard charging-handle latch with an extended model, such as Badger Ordnance’s Tactical model is easy, or charging handle is easy.
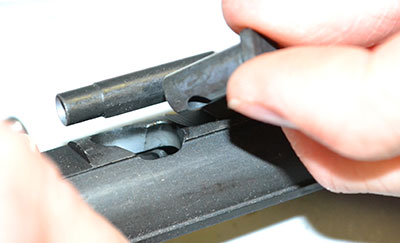
Start the latch retaining pin in the charging handle. It will help to use a 1/16-inch roll-pin holder punch to start the pin. Place the spring in the charging handle, and insert the latch into its slot. Hold the latch under spring pressure so the holes for the retaining pin are lined up, and tap the pin into place using a 1/16-inch roll-pin punch. Should you have trouble lining up the holes, you can also use a 1/16-inch punch as a slave pin.
A plethora of aftermarket optics-compatible charging handles exist, as well. Being a southpaw shooter as a result of my physical disability, I opted for the ambidextrous design of Ranier Arms’ Raptor. While there may be less-expensive models out there, its large tabs make cycling the bolt a much easier, which is a huge plus as they will undoubtedly offset my reduced motor skills.
In the next entry, we’ll discuss how to install the barrel.
Parts
Bolt carrier
Bolt assembly
Bolt-cam pin
Firing pin
Firing-pin retaining pin
Charging handle
Charging-handle latch
Charging-handle spring
Charging-handle latch pin
Tools
1/16-inch roll-pin punch
1/16-inch roll-pin holder punch
Brass or plastic hammer Brownells bench block
Installing the cam pin holds the bolt in the carrier and a simple quarter turn creates a place for the firing pin.
Prior to doing do, I made a point to disassemble the bolt and add an MGI D-Fender D-Ring beneath the extractor to create greater tension for improved reliability. (The bolt was shipped with gas rings already installed.)
After giving the bolt cam pin a quarter turn insert the firing pin into the rear of carrier, push it flush and lock it inplace with the firing pin retaining pin.
Install the charging handle by placing it in its slot in the receiver. Pull the bolt forward in the carrier, and place the carrier into the receiver so that its gas key rides in the trough on the underside of the charging handle. Make sure the carrier and the charging handle can move in the receiver without any problems. Then take both parts out and set them aside.
Optics sometimes make it hard to reach the charging handle. Since my rifle is destined for hunting, an optic is a definite. Unfortunately, most magnified optics feature large ocular lenses that can get in the way of accessing the charging handle. Fortunately, swapping out the standard charging-handle latch with an extended model, such as Badger Ordnance’s Tactical model is easy, or charging handle is easy.
Start the latch retaining pin in the charging handle. It will help to use a 1/16-inch roll-pin holder punch to start the pin. Place the spring in the charging handle, and insert the latch into its slot. Hold the latch under spring pressure so the holes for the retaining pin are lined up, and tap the pin into place using a 1/16-inch roll-pin punch. Should you have trouble lining up the holes, you can also use a 1/16-inch punch as a slave pin.
A plethora of aftermarket optics-compatible charging handles exist, as well. Being a southpaw shooter as a result of my physical disability, I opted for the ambidextrous design of Ranier Arms’ Raptor. While there may be less-expensive models out there, its large tabs make cycling the bolt a much easier, which is a huge plus as they will undoubtedly offset my reduced motor skills.
In the next entry, we’ll discuss how to install the barrel.