I am blessed to have a shop full of purpose-built gunsmithing equipment and a great job that provides me ample means to modify my firearms as I see fit. The first modern upgrade I gave one of my personal rifles was at the expiration of the infamous 1994 "Assault Weapons" Ban. I retrofitted my post-ban Armalite M4A1C with a collapsible stock as soon as it became legal to do so. I had no idea that wrenches existed for the specific purpose of removing and installing receiver extensions/buffer tubes (I was an Army grunt, not an armorer) so I did it with standard tools. The result was a bit rough but it worked and more importantly, it gave me the satisfaction of customizing the carbine.
Thanks in large part to the very modular nature of modern rifles; you need neither the full complement of tools nor years of experience to upgrade your guns. The AR family of firearms is a prime example of how Do-It-Yourself upgrades are easy for anyone willing to read instructions and turn a screwdriver or wrench. Since many manufacturers are incorporating AR components into non-AR firearms, I will examine a few simple upgrades in this series of articles, starting with changing a buttstock.
Swapping buttstocks of the same type—one collapsible to another or one fixed to another—is about as simple as an upgrade gets. Most collapsible stocks come off the receiver extension (aka buffer tube) without any tools and can be changed in a matter of seconds. The only trick is to be sure you have the correct diameter—either "MilSpec" or "Commercial". So-called MilSpec stocks use a slightly smaller diameter tube and will not fit on a commercial receiver extension. While you can put a commercial sized stock on a MilSpec tube, it will be loose to the point of being sloppy. If you are unsure which size you have, the outer diameter of commercial tubes runs around 1.175 inches while MilSpec buffer tubes run closer to 1.150 inches from side to side. You need calipers or a micrometer to measure this accurately because holding a ruler up to the back end of the tube yields inaccurate measurements.
On the fixed side of the house, standard A1 and A2 AR stocks are attached with a single slotted screw near the top of the stock's butt pad. Removing that screw will allow the stock to be slid rearward and replaced with something more functional. Some aftermarket stocks require the A2 stock's spacer to be reinserted in them before sliding onto the tube and some do not. Just follow the directions. The only tool required is a slotted driver to remove the old fixed stock and whatever type of driver the new stock requires—usually a slotted screwdriver or hex key.
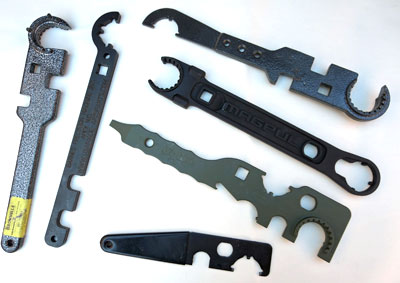
Switching from fixed to collapsible or vice-versa is not overly complicated but a buttstock wrench is very helpful. Many companies make them—I have six different stock wrenches and all have their strengths and weaknesses. A simple, stamped steel TAPCO wrench (the smallest one pictured) is the one I rely on most.
Several small pins and springs are retained by the buffer tube so pay close attention to how everything comes off or out of the receiver and always wear eye protection. If you are not careful, the buffer retainer and spring will rocket straight up at Mach 3 while removing the buffer tube. I'll briefly cover how to switch an AR's stock from fixed to collapsible, since that is the more common modification.
Fixed Stock Removal
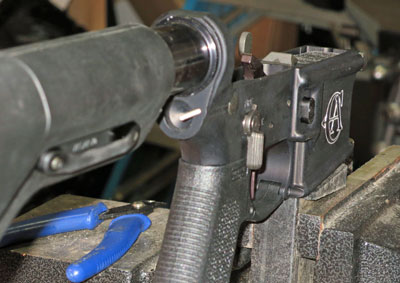
1. After clearing the rifle and separating the upper and lower halves, anchor the lower in a vice. The preferred way is to use a lower receiver vice block, like the ones available from Brownells and other gunsmithing-oriented companies. If this is a one-time deal and you don't want to spend the $50, an old magazine can be used as a vice block. But consider it permanently relegated to vice duty once you are done. Padded vice jaws may also be used to hold the lower receiver so long as you don't get crazy tightening it.
2. Remove the buffer and buffer spring by depressing the buffer detent and controlling buffer and spring as they come out.
3. Use the appropriate driver to remove the buttstock screw that holds the stock to the receiver extension. MilSpec setups are usually held tight with a mild thread-locking compound so use a parallel-sided screw driver that fits the full slot to keep from having it skip out and mar the screw.
4. Once the screw has been removed, the stock should slide straight off the tube. It may be necessary to lightly tap it off from front to back with a rubber mallet.
5. At this point the rear takedown pin detent spring will be visible at the 5 o'clock position as you look at the lower receiver from the rear. Remove this spring and hold for later use.
6. Remove the buffer tube using a 5/8" open ended wrench (buttstock wrenches have slots for this purpose). If there is even a chance the buffer tube has been locktigthed in place, apply a few seconds of torch heat to the union of the tube and lower receiver. Before unscrewing the buffer tube, place a finger or tool on the buffer retainer to hold it in place once the tube starts backing off.
7. Do not apply heat to a polymer receiver. If a thread-locking compound like Locktite, Rocksett, Vibra-Tite or similar product was used on a buffer tube in a polymer receiver, gradually heat only the buffer tube several inches away from the receiver. The thread-locking compound must release before you try to remove the buffer tube in this case because non-reinforced polymer lowers tend to break at this point.
8. As soon as the front of the buffer tube clears the buffer retainer and spring, remove and set them aside. The buffer tube should unscrew easily at this point. Set it, the fixed stock, stock screw and the rifle buffer and spring aside. You won't need them any further for this modification.
Installing a Collapsible Stock
1. Clean the internal receiver threads and the threaded end of the new buffer tube before starting the installation.
2. Screw the castle nut all the way rearward onto the buffer tube with the open teeth of the nut facing the rear/closed end of the tube.
3. Slide the endplate onto the buffer tube so the key fits into the slot at 6 o'clock. Be sure the raised punch-out portion of the endplate faces forward on the buffer tube.
4. Ensure the rear takedown detent is still in place inside the lower receiver. If you left the receiver in the vice, the pin should still be there.
5. Optional: Apply a small amount of thread locking compound like LOCKTITE 242 (blue) to the buffer tube's threads.
6. Begin screwing the tube into the receiver, taking care not to cross thread it.
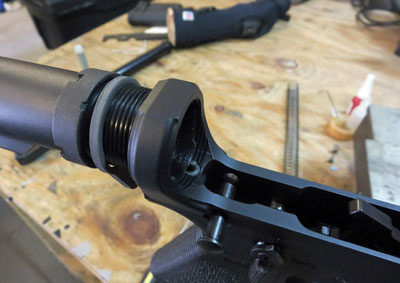
7. Stop just short of the point where the receiver extension's front end covers the buffer retainer pin. Insert the spring and retainer pin (if not already in place) and depress the pin with a small flat blade driver. Reminder: wear eye protection
8. Continue threading the buffer tube into the lower until the buffer retaining pin is held in place by the buffer tube.
9. Carefully turn the tube a little further (about 15 degrees clockwise) but not so far that the buffer detent pin is released. This will expose the hole at the rear of the receiver for the rear takedown pin detent spring.
10. Reinsert the detent spring and use a small set of needle-nose pliers to compress it while rotating the buffer tube counter-clockwise until the endplate is again vertical.
11. Use one hand to slide the endplate forward along the buffer tube until the stamped out portion seats in the lower receiver's recess. This also compresses the rear takedown pin's detent spring in place. Be careful not to kink the spring—it should go straight into the hole and be held by the endplate. You should have no gap between endplate and receiver. Some aftermarket endplates need a little rubber mallet encouragement to fully seat.
12. Apply a small amount of Locktite 242 or equivalent to the threads just behind the endplate.
13. Screw the castle nut in place until tight (by hand) against the endplate.
14. If using a closed end wrench like the MagPul, slide it over the buffer tube until it engages the teeth of the castle nut. Spanner-type wrenches with an open side need not be fitted to the castle nut at this point.
15. Install the collapsible stock onto the rear of the buffer tube. It is not necessary to fully lock it in place at this point. The stock will be used to support the lower receiver and buffer tube during the next step.
16. Use a stock wrench to tighten the castle nut. Hold the stock to apply torque in the opposite direction. This will help to alleviate stress on the lower receiver and also prevent the buffer tube from screwing in further, damaging the tube's endplate keyway.
17. Look at the buttstock from the rear to ensure it is aligned vertically. If not, loosen the nut and adjust as needed to get the stock on straight.
18. Once the stock is aligned, fully tighten the castle night, taking care not to twist, bend or break the lower receiver, especially if made of polymer.
19. For extra security, stake or peen the castle nuts in two of the three small, forward facing slots butted up against the endplate. I use a center punch to peen the metal into position here. I see many loose castle nuts on guns my customers bring in for work and staking or peening in this manner will help the LOCKTITE to keep the nut from coming loose.
20. Fully install the buttstock in accordance with the manufacturer's instructions.
21. Install a carbine-length buffer spring and buffer.
22. Reassemble the upper and lower and perform a functions check.
23. Have fun with your newly modified AR.
If swapping from a collapsible to fixed stock, you will have to reverse the instructions. While it seems like a lot of steps for a simple stock conversion, the process is pretty fast. I have a lot of practice and can do this whole procedure in about five to seven minutes. Even my first attempt—with no instructions or proper tools—only took about twenty minutes. Lay out your tools and parts ahead of time and enjoy this leap into the do-it-yourself arena.