The AR-15 rifle has a place in any home-defense strategic planning, and every gun owner who cares about the safety of his family is well advised to have one ready for trouble.
The concept of this article originally was to build a home-defense, AR-15-style rifle from parts and save money. That might have worked at one time, but just as I started this project, the Obama sales stimulus plan for AR-15s slammed shut. The boom ended and all those back-ordered rifles ended up in warehouses. The result is that some companies are selling ARs for low prices just to move inventory. But, with those rifles, you get what you get. Remember, these are guns nobody is buying. That means most of us will be removing some parts and replacing them with what we really want, and suddenly the price becomes much higher.
I decided to design and build an AR-15-style carbine with parts from Brownells—a company that has emerged as a one-stop shopping source for all things AR. My idea was to keep the features and options in line with what I want, not what somebody else is trying to move out the door. The budget goal was $1,000. My mind must have been infected by the "Congressional Spending Virus" from watching too much of the health care debate on TV. I could have made that tight budget, but I got carried away in places, which I'll explain as we progress.
This is the first of the two-part series on how to assemble the rifle, covering the features I chose and why. Instructions on how to put it together are also included. Part two runs in the July issue and will cover the upper receiver, as well as accessories I added.
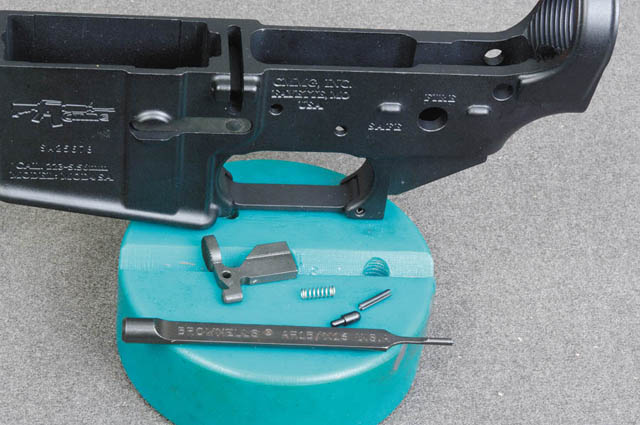
One tool very helpful for this project is a Brownells AR-15/M16 Lower Receiver Vise Block. This inserts into the magazine well and allows you to clamp the bottom end in a bench vise to hold the lower while you work on it. Brownells also has a DVD called "How to Build an AR-15," as well as several helpful books.
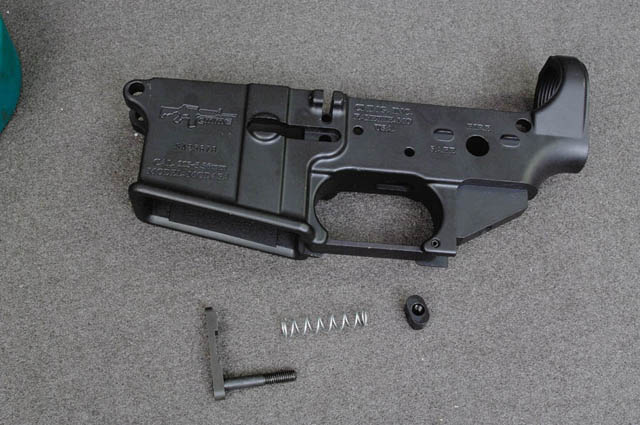
The key to any good project is the foundation and on an AR-15, that is the lower. Think of it like a house. You can build the most incredible house imaginable, but it will never be solid if the foundation is not good enough to support it properly.

The lower starts with a receiver. Spikes Tactical makes a stripped lower receiver that Brownells sells for $89.95. That's the least-expensive lower receiver I could find on its website. There were seven customer reviews and all were favorable, but they were back-ordered. I had a deadline, so I upgraded to the CMMG MOD4SA for $149.99. It whacked my budget a little right out of the gate, but it's turned out to be an excellent receiver. It's amazing how important budgets become when you don't have other people's tax dollars to spend. I checked as I am writing this a few months later and Brownells has the Spikes Tactical receivers back in stock.
The High Standard Lower Receiver Parts Kit contains all the smaller parts you will need, including the trigger and grip for $89.99. Again, the DPMS version would have been $30 less expensive, but it was out of stock.
You will also need a buttstock and related parts. I think that an adjustable buttstock is the only way to go for a home-defense carbine. I selected the Brownells AR-15/M-16/M4 Six Position Adjustable Buttstock, which comes with everything you need.
Putting It All Together
My grandfather told me years ago, while teaching me to build auto engines, that the best strategy is to do the toughest job first. He was a part-time gunsmith and noted that philosophy applied to anything mechanical, including guns. So with that in mind, tackle the trigger assembly first.
As DPMS founder Randy Luth pointed out, there is another good reason to start there. He explained, "The alignment of the trigger or fire control pins is critical to how well that receiver is going to work. If they are off, even a little bit, you have a problem. So, install the trigger assembly first to be certain the holes are located properly on the action. Better to find out first thing than to do all that work on the other parts, only to tear them down if the action is not true."
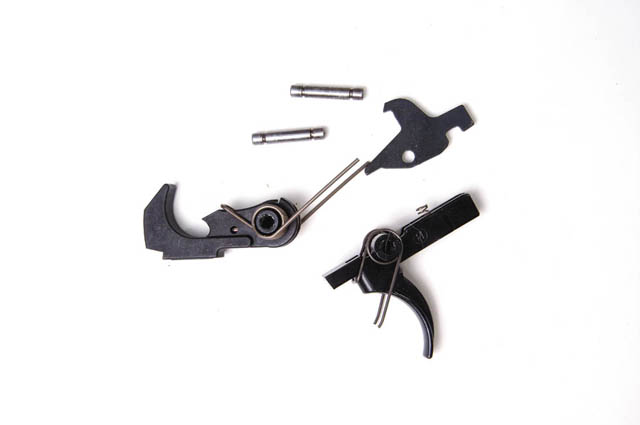
Step 1: Install the Trigger Group
Parts
•Hammer and Trigger Pins (2)
•Hammer
•Hammer Spring (the larger of the two similar springs in the kit)
•Disconnector
•Trigger
•Trigger Spring (the smaller of the two similar springs)
•Disconnector Spring (this is similar to the bolt-catch spring, but is identifiable because one end is wider than the other)
Tools
•5⁄32-inch pin punch (Optional)
Install the trigger spring on the trigger. The top square loop will hook under the front of the trigger and the legs will point forward with the bent tips pointing up. They will push on the bottom of the receiver when the trigger is in place.
Install the disconnector spring in the hole at the top-rear of the trigger. The larger end goes in the trigger. Push it in until it locks.
The disconnector goes into the trigger and a single pin will hold both in place.
Insert the trigger assembly into the receiver and align the hole with the back one of the two pin holes in the receiver. You will have to push on the trigger and/or disconnector assembly to load the springs and to help align the holes for the trigger pin. It helps to use a straight-sided 5⁄32-inch pin punch as a slave pin to keep everything in alignment before you install the trigger pin.
The trigger pin has two grooves in it, but it doesn't matter which way it is inserted. The accepted method is to push it left to right, with the groove on the left side. I don't know why and it doesn't really matter.
Install the hammer spring on the hammer. The legs of the spring should point down; the square, looped portion of the spring will be on the rear side of the hammer. Install the hammer in the receiver with the spring feet pointing back and resting on the trigger pin. When the spring is loaded, the legs will point to the back of the gun and one leg will fit in the groove on the trigger pin. Use a slave-pin punch to align the hammer as you compress the spring. Then install the hammer pin, pushing the slave pin punch out as you do.
*The author went with a Timney trigger in his lower build.
Function Check
Cock the hammer. Pull the trigger and make sure it releases the hammer. Do not let the hammer hit the receiver. The Brownells AR-15 Hammer Drop block is a great tool for dry firing as it stops the hammer before it hitsthe receiver.
Keep holding the trigger back. Push the hammer back and the disconnector should catch and hold the hammer. Releasing the trigger should cause the disconnector to release the hammer, which should then catch on the trigger sear in the cocked position. Repeat this test several times to ensure the trigger, hammer and disconnector are all working properly.
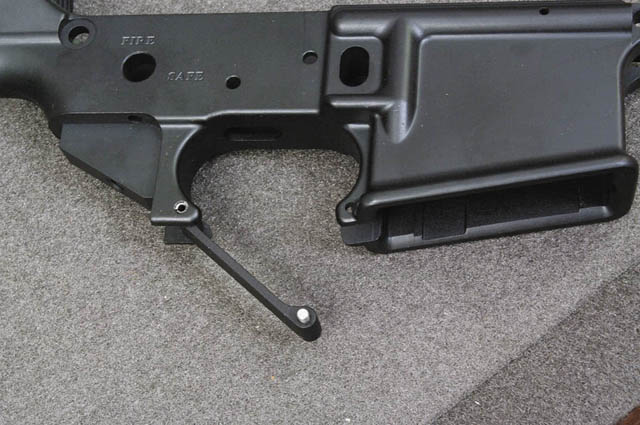
Step 2: Install the Safety and Grip
Parts
•Safety (called the fire-control selector in AR jargon)
•Fire-Control Selector Detent
•Fire-Control Selector Spring (this is similar to the pivot/takedown detent springs, except there are two of them and only one fire-control selector spring—look them over carefully and you can see the difference)
•Pistol Grip•Pistol-Grip Lock Washer•Pistol-Grip Screw
Tools
•Screwdriver or Allen wrench to match the grip screw
Insert the safety from the left side. Check to see that the safety turns freely and that it locks the trigger so the hammer will not release when in the safe position.
Turn the receiver upside down. Insert the detent into the small hole at rear of the trigger guard on the left side of the upside-down receiver. Insert the spring in the hole in the pistol grip and install the grip, aligning the spring with the detent and the hole in the receiver. Make sure the safety is in the "fire" position. Carefully push the grip in place while compressing the spring. Secure the grip with the screw and washer. Most are slotted for a screwdriver, but some require an Allen wrench. I like to add a drop of #242 blue Loctite.
Function Check
Turn the safety to make sure it rotates to the safe and off positions and that it locks into those positions. Note that the hammer must be cocked for the safety to move to the on position.
Check again to ensure the safety is preventing the trigger from releasing the hammer, by putting the safety on and pulling the trigger forcefully, multiple times. Push the safety off and verify the hammer stays cocked. The trigger should release the hammer when the lever is in the "fire" position.
Step 3: Install the Magazine Release
Parts
•Magazine Catch
•Magazine Release Button
•Magazine Release Button Spring (largest spring in the parts kit)
Tools
•A punch or dowel
Slide the shaft of the magazine catch through from the left side of the receiver. Put the spring over the shaft and then put the button on the end and push, letting the magazine catch slide back until the button is captured in the hole on the right side of the receiver. Keep finger pressure on the button, push on the mag catch and turn to start the threaded end of the shaft into the threaded hole on the button. Using a punch or dowel, push the mag button deeper into the receiver. Screw the mag-catch holder until the end of the threaded shaft is flush with the top of the release button. Be very careful not to hit the receiver with the mag catch, as that can damage the finish.
Function Test
Push the button down flush with the receiver. Make sure the mag catch is still captured in the receiver. If it comes out of the receiver enough so that it can turn, you must make another revolution of the threads. Make sure the mag catch will go past flush on the inside to ensure it releases the magazine.
Insert an empty magazine and make sure it is captured tightly. Push the mag-release button. The magazine should release cleanly and easily.
Step 4: Install the Bolt Catch
Parts
•Bolt Catch
•Bolt-Catch Pin (the smaller of the two roll pins in the kit)
•Bolt-Catch Plunger
•Bolt-Catch Spring (easily confused with the disconnector spring, although the disconnector spring is wider on one end)
Tools
•Small hammer, plastic and brass tipped preferred
•3S pin holding punch (optional)
•3⁄32-inch roll-pin punch
•Brownells Bolt Catch Pin
•Punch (optional)
Insert the roll pin into the pin-holding punch, or hold it with needle-nose pliers as you start it into the rear side of the pin hole, tapping lightly with the hammer to start it in the hole. Place the spring in the hole centered under the bolt catch and follow with the plunger. Install and push down on the bolt catch to compress the spring and insert the Brownells Bolt Catch Pin Punch from the left to act as a slave pin. This tool is machined to allow using it from the left side as a slave pin or to remove an installed bolt-catch pin by driving the pin out to the rear. Without, it you risk scratching the finish on the receiver. Trust me, I speak from experience and have gotten very good at touching up the marks. But they will always show, so not scratching the finish is a much better option.
Using the 3⁄32-inch roll-pin punch and hammer, drive the roll pin into place, using it to push out the slave pin. Insert the pin deep enough so that it is of equal depth on each side.
Function Check
For now, make sure the bolt catch operates smoothly and does not hang up or bind. You will test it further once the upper is installed.
Step 5: Install the Trigger Guard
Parts
•Trigger Guard
•Trigger Guard Roll Pin
Tools
•Small hammer (plastic and brass tipped preferred)
•4S pin-holding starter punch (optional)
•1⁄8-inch roll-pin punch
•1⁄8-inch pin punch (optional)•Bench block
The front of the trigger guard should have a spring-loaded detent already installed. Compress this and insert the trigger guard into the front, making sure the detent is on the same side as the hole.
Put the receiver on a bench block to support it. A block of wood will also work. Use the roll-pin-holding starter punch to start the roll pin, or hold it with needle-nose pliers as you start it. It's usually a tight fit and it's easy to damage the end of the roll pin. It is better to use a slave pin as you gently start the pin through the receiver and into the trigger guard. Carefully use the roll-pin punch and hammer to drive the roll pin into the receiver. Check to ensure it is of equal depth on both sides.
Function Check
Depress the detent on trigger guard and make sure that the trigger guard will pivot open.
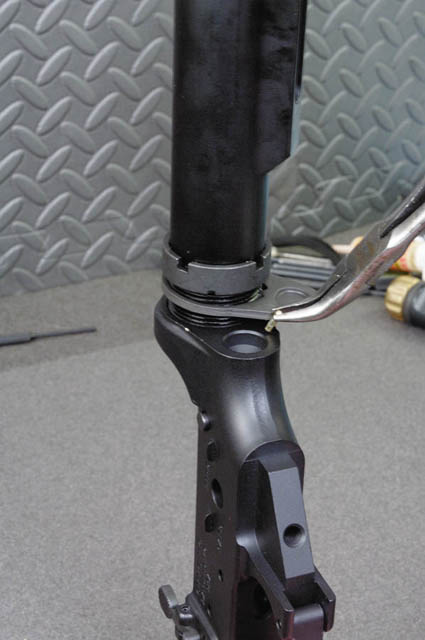
Step 6: Install the Buttstock
Parts
•Stock
•Buffer Tube
•Takedown Pin
•Takedown-Pin Spring
•Takedown-Pin Detent
•Buffer Tube Retainer
•Buffer Tube Retainer Spring
•Carbine-Style Buffer
•Carbine-Length Buffer Spring
•Receiver Lock Plate•Lock Nut
Tools
Wrench for locking nut—I suggest the DPMS Multi-Tool
Insert buffer tube retainer spring and buffer tube retainer into the hole in the threaded section to the rear of the lower. Thread the locking nut onto the buffer tube and spin it all the way to the rear.
Place the receiver lock plate over the buffer tube and thread the buffer tube into the receiver while compressing the buffer tube retainer. The buffer tube must go in enough to capture the buffer tube retainer, but not enough to bind it.
Place the takedown pin in the receiver. Insert the detent and spring in the hole in the rear of the receiver. Push the receiver lock plate into place to align the buffer tube while compressing the detent spring. Now tighten the lock nut. There are several wrenches to do this, but the DPMS Multi-Tool will also perform many other functions on the AR-15 and represents an excellent value. There are pre-cut locations for staking the nut to the receiver lock plate if you wish. Most, including myself, don't bother.
Cock the hammer, depress the buffer tube retainer and insert the buffer spring, followed by the buffer. Push them in past the retainer and allow the retainer to pop up to hold them.
Remember I said we would do the toughest job first? I lied.
Installing the front pivot pin is simple on the surface and aggravating in reality. If you are going to attempt this without the correct installation tool, make sure there are no children present, because this job will make even the Pope cuss like a drunken sailor.
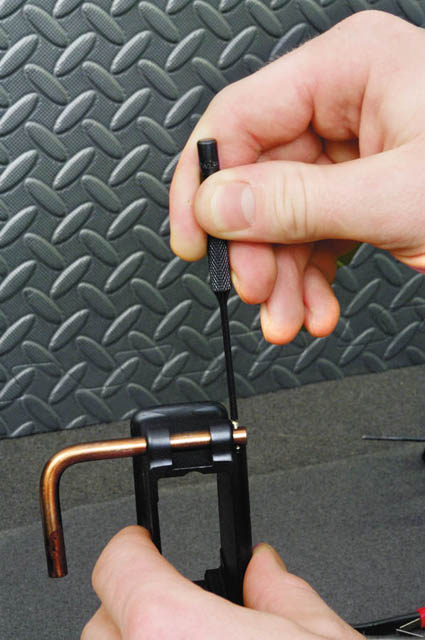
Step 7: Install the Pivot Pin
Parts
•Pivot Pin
•Pivot-Pin Detent
•Pivot-Pin Detent Spring
Tools
•Pivot-pin installation tool
•3⁄32-inch pin punch
•A big jar swollen full of swear words
This can be done with just the pin punch, but it's not pretty. You must compress the detent and spring and then insert the pivot pin. Sounds easy, but it's not. The detent and spring will fly out and you will be spending a lot of time on your knees looking for them.
Brownells sells two tools for this job. The one for $14.95 will reduce your swear words by about half, as it requires a learning curve. It is simply a bent shaft with a drilled-in hole. It works well in theory, but execution requires you can chew gum, walk, talk, text and dance all at the same time. I, apparently, cannot.
Trust me; you want the two-piece set. It costs more, but it works much better. Install the jig on the front of the receiver to align over the right side. Insert the tool pin from the left and rotate until the hole is lined up with the hole in the receiver. Insert the spring and detent. Push them into the receiver using the 3⁄32-inch pin punch until you can rotate the tool pin to capture the detent. Now lay the pivot pin in the tool guide with the slot toward the detent and push until you hear the detent click into the slot. Remove the installation tool and then you are done building this lower.
Say three Hail Marys as penance for your foul language and then start thinking about your upper, because this thing is a wrap. When you're ready to tackle building an upper receiver, here are complete instructions.